Virtools 3.0 Review

2004-05-21

I recently decided to try Virtools to prototype my team’s next game and it was one day it hit me: I was actually having fun making games again. Several of my programmer friends have mentioned to me before about how tedious making a game can be. There can easily be 5 to 10 man years of work involved in getting an entire game engine, tools, pipeline, etc, ready. Many of them also played around with web programming, generally for their personal webpage and they mentioned how much fun it was since feedback was immediate. You’d edit a few lines of code, press refresh on the browser and see if the result was what you expected.

Well, that is how I felt while using Virtools. What makes it so cool, so fun, is you are editing the game WHILE IT IS RUNNING! Some companies and middleware have systems were you can edit a few things while the game is running, tweak a few variables, adjust a few links but that’s about as far as they get. In Virtools you can adjust everything INCLUDING THE CODE while the game is running!

The time it really donned on me how cool Virtools is was while I was running the game I added an entire radar system and edited the code for computing the positions of the dots on the radar in real time. My formulas were a little bit off at first so I adjusted them, pressed compile and that function was recompiled WHILE THE GAME WAS RUNNING and the dots on my radar responded immediately until I got it right. This is the power of Virtools!

Testing it out

I’m hoping by now you are thinking about giving Virtools a try. If so I want to give you one piece of advice. Virtools, like Maya, 3D Studio Max and Flash, is a very large very complicated program. You will not install it and be making a game in an hour. For me I decided on the type of game I wanted to make and then I read the entire manual. I’d say all in all it took about 2 weeks for me to get comfortable with it, about the same amount of time as it took me for Max and Maya. Please keep that in mind. Pick a goal, set some time aside and expect it to take a couple of weeks to really get it.

Another issue is that even after that 2 weeks, to make my prototype would probably have taken less than a 1 week but there was time spent in learning the Virtools way of doing things and also its current limitations and workarounds. In other words, expect that it will take a little bit of time for you to grasp how to go about implementing particular ideas in Virtools.

Virtools, what is it?

Virtools is an “Interactive 3D software” editor. In other words is an editor for making interactive 3D software. Think of it as a 3D program like 3D Studio Max or Maya except that as you put objects in the scene you can give them behaviors to follow and that unlike Maya or Max, Virtools is designed to run in real time.

I’ll be honest, in the past I would generally dismiss this kind of software. There have been other products that tried to do this, some over 10 years old that ran on SGI Onyx machines back in the day. Even then they were not very impressive.

What made me sit up and look at Virtools was one of my co−workers, a non−technical game designer had managed to get hold of an evaluation copy of Virtools and convinced management to give him a month to play with it. In that month with no prior programming experience he was able to basically create an entire level for a character action game on his own including making his own graphics (He had previously learned Lightwave).

I’m not just talking about your typical “make a guy walk around a level” demo. There are lots of engines that will let you pop in a walking character and have it walking around in a short amount of time and it will look like you’ve made a lot of progress when in fact you’ve done nothing. No, this designer had his character walking around, he had animals you could hop on and ride, he had 3 or 4 kinds of enemies you could interact with, he had non player characters you could recruit and you could command them to do various things. He had several game setups, cliffs you could climb, moving platforms, all kinds of stuff and he had done all of this without any programming experience in a single month. He even had a PS2 controller connected to his PC and had it displayed on the TV so it felt like a console game and not a PC game.

It was his example that made me want to seriously take a look. Here is what I found

The Interface
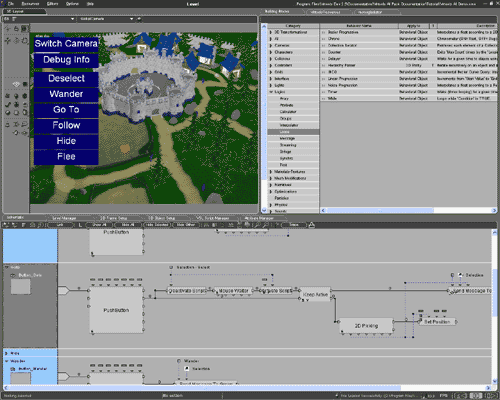
figure 1 (click for a larger version)

Virtools, like many 3D programs, has a paned and tabbed interface that makes it generally easy to get around as there are so many different parts of the program that you’d need a 10 foot by 10 foot screen to display them all at once. Fortunately if you happen to have multiple monitors you can detach any individual display and then drag it to another monitor.

Generally the top left is your 3D view. Here you can place, orient and position objects, cameras, lights etc. The top right is your list of pieces, parts, 2D assets, 3D assets, sounds, logic items, etc. Virtools has resource folders similar to Maya’s scene folders. They represent a tree of folders on your hard drive and are updated in real time. The folders are for your convenience. One for 2D images, one for 3D objects, one for characters, etc. If you put some more assets into your resource folders they will automatically show up in Virtools interface ready to drag and drop into your scene.

The bottom pane is where most detailed editing happens. It is here you can set specific attributes on the various types of items you can put in your scene as well as edit scripts and code. See figure 7 for a short glimpse of some of the various editors.
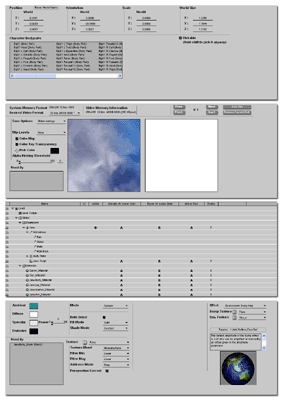
figure 7 (click for a larger version)

One step at a time

Virtools has what they call “Building Blocks” or BBs for short. These generally represent small functions or systems that you can insert in your scene.

To give you a simple example if you have a character with animations you can drag it from your resources and drop it in your scene. Then you can go over to the building blocks and find the Character Controller BB, drag and drop it on your character. A dialog will pop up asking you what your walk, run, walk backward, and stand animations are. You select them and click OK. Then drag a Keyboard Controller BB on your character. Press play and you can now walk your character around using the numeric keypad keys.

If you know the interface and you already have your assets you can have a character walking around a level in approximately 30 seconds.

Schematic

Of course that is an extremely simple example designed to get you started. The real power of Virtools lies in its schematic system which is Virtools’ visual scripting language

If you go over to the schematic pane for the last scene you’d see something like figure 2.

figure 2

Figure 3 is the same thing with the inputs pulled out so you can see them.

figure 3

When you drop a BB into your scene Virtools automatically generates a schematic for them. Of course you can also directly drag and drop BBs into your schematics.

Each BB is represented by a box, on the top of that box you will see inputs or pIns (parameter In) as Virtools calls them. In the example above the 4 inputs are the 4 animations that represent walk, run, walk backward and stand. A loop BB might have start value, number of iterations and step. You can hover the mouse over any input to see what it is. You can also generally double click on the BB and a dialog letting you edit all the inputs will appear.

Those input values can come from static constants as they do in the above example or they can come from variables. (called local parameters by Virtools) They can also come from the outputs of other BBs.

Some BBs have outputs. Outputs appear on the bottom of the BB’s box. For example the Timer BB has 2 outputs or pOuts as Virtools calls them. One is the elapsed time, the other is the delta time or amount of time since the last loop iteration.  A Timer BB loops for a specified amount of time. Figure 4 is an example of fading the background color from black to yellow over time. The duration of the time is set to 3 seconds.
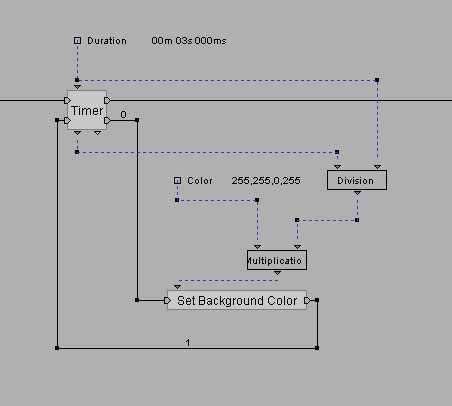
figure 4

The dashed lines represent the flow of data. The solid lines represent the flow of execution. The Timer BB loops through the Set Background Color BB which takes a color as its input. The color is computed by dividing the elapsed time output of the Timer BB by the duration giving a value from 0.0 to 1.0, the color we want is then multiplied by that result and finally fed into the Set Background Color BB.

Each BB also has Behavior Ins (bIns) on the left and possibly optional Behavior Outs (bOuts) on the right. For example the timer has 2 bIns and 2 bOuts. One bIn called “In” starts the loop”, One bOut “Loop Out” and one bIn “Loop In” represent the execution flow for the loop of the timer. Finally there is an “Out” bOut that represents the execution flow after the loop has finished

The bIns and bOuts are connected by solid lines and above them are numbers. In the above example they are 0 going from the Timer BB to the Set Background Color BB and 1 from the Set Background Color BB back to the Timer BB. Those numbers represent link delays. For each iteration of the Virtools game engine your schematics will run until each one hits a link delay greater than 0. For any particular script Virtools will check for infinite loops. I think the default is 8000 BBs executed without a link delay although you and adjust that value.

Now, if you are a non programmer, this might all make more sense to you. There is no such thing as variables. There are just inputs and outputs representing how data flows. This is probably one thing that makes a system like this easier for non programmers as they can visually see what is happening. But, for you programmers out there, I’m sure the math in that last example might be making you nuts, putting division and multiplication boxes out there, any slightly complex calculation and it could get really hairy.

VSL: Virtools Scripting Language

Fortunately, Virtools has a solution called VSL or Virtools Scripting Language with which you can make your very own BBs. Let’s change the above example to fade from one color to another. That might be a little too involved using lots of boxes for calculations so we’ll use a Run VSL BB.

First you drop a Run VSL BB into your schematic and rename it to something that makes sense like “Fade Between Colors”. Select it, right click and pick “Edit VSL Script”. Up pops a text editor, on the right is a list of all the bIns, bOuts, pIns and pOuts for your script and you can define more. I’m going to define 4 pIns. duration (float), elapsedTime (float), startColor (color), endColor (color) and one pOut called resultColor (color). Once I’ve done this I can reference those in the code. See figure 5
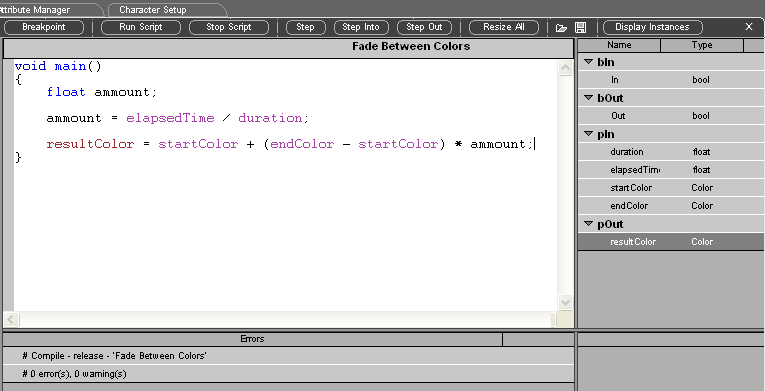
figure 5

Now if I go back to the schematic you will see my new BB has 4 inputs and 1 output. All I need to do is connect them as in figure 6. I connected the duration and elapsed time from the Timer BB and I’ve set the startColor and endColors to yellow and cyan respectively. Then I’ve linked the resultColor output of my new BB to the color input of the Set Background Color BB and wala!, I’m fading from yellow to cyan. I can change and edit any of those values while it’s happening as well, the 2 colors and the duration.
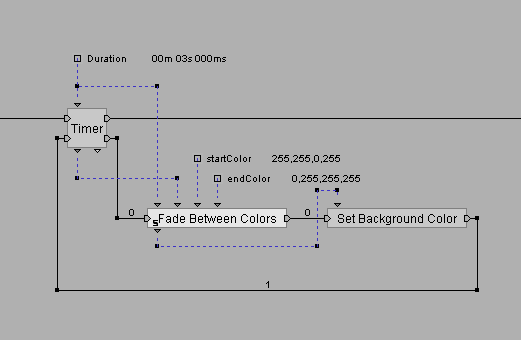
figure 6

If my BB needed to be able to branch or have multiple paths into it I could also add more bIns and bOuts as well.

Those 2 features, the schematic and VSL are what really make Virtools shine. They can be edited in real time while the game is running and that makes it extremely quick to work up some new idea.

C++ plugins

Sometimes you need something more, like maybe you have a physics system you want to implement or a complex character animation system. In that case you can make BBs in C++. Virtools comes with an SDK and you can make whole sets of BBs that fit into a DLL and appear as part of Virtools. In that case the sky is the limit.

In fact, Virtools themselves sell a few of these. One is a Havok based physics integrator. Another is an A.I. pack that gives you access to various A.I. algorithms. There’s also a mutli−player pack for online networked games.

Behavior Graphs

Virtools also allows you to build BBs with other BBs.  You can select any part of a schematic and turn it into what they call a Behavior Graph or BG. They are basically the same as a BB except built out of schematic. You can add pIns and pOuts as well as bIns and bOuts so if you make some particularly useful function or behavior out of BBs you can turn it into a BG and start using it in other places.

Tips

If you are just starting out there are a few things you should know. The biggest issue with Virtools is knowing all the BBs. Think of BBs as your library. Like Perl and Java the libraries are so large it seems impossible to know them all but if you at least skim through them you’re more likely to find a solution than make one up.

One of the coolest and well thought out things about Virtools is that they went through and made all the BBs connect to their corresponding help so you can double click almost any BB in the Building Blocks pane and the help for it will appear. This is especially great if you have two monitors. Just move the help window to your second monitor and you can read the help while you use the BB.

On top of that, almost every BB has a sample scene to show how to use it. The help has a link to the scene which if you click on it will run the scene in the Virtools player. The scene’s source is included so you can load it into Virtools and go inspect the schematics and see how it all works.

Arrays

Virtools has something called Arrays. When I hear the word array I think of an array of integers or an array of characters. But, Virtools arrays are arrays of structures. You can have pretty much any Virtools data type as a column in your array.  For example: animations, cameras, 3D entities, meshes, materials. Remember that, if you need a table of something you can use a Virtools Array. For example an array of monsters: The first column might be a column of strings, the name of each monster. The second column could be the 3D character data needed to display the monster. The 3rd might be hit points, etc.

Virtools arrays can also be built on the fly and you can add columns on the fly as well so if you need a way to store stuff at runtime that’s one way.

The only disappointing thing about arrays is the columns are referenced by index, not by name. There is a little bit of help with the Get Row BB and Set Row BB which give you inputs or outputs for every column by name but setting or getting individual cells is unfortunately by index. That means adjusting an array can break your scripts and schematics, something that wouldn’t happen in a standard higher level language.

Attributes

Virtools allows you to a ttach attributes to various objects. While Virtools uses this for various options you can use it as a way to pass information to spawned objects. For example if you have an enemy generator when you generate the enemy you could attach some attributes to it and fill them with values that are specific to that enemy.

System BBs vs Functional BBs

Some BBs act like a C++ function. The Set Background Color BB above is an example of this. All it does is set the background color of the scene and exit. Other BBs actually start up parallel processes or systems. An example of one of these is the Character Controller BB. You’ll notice in the schematic above it’s started and then that’s it, there is no program flow following it and no loop to execute it each frame. That’s because that BB represents a system that is running in parallel with your other schematics.

What’s important to know is that that one Character Controller BB represents one and only one instance of a Character Controller system. If you wanted to control 2 characters you’d need two of those boxes, one for each character.

The particle systems are also similar so you could not make a loop that started 6 particle systems using only one particle system BB. The BB represents one and only one particle system.

Initial Conditions

Virtools has this concept of initial conditions. By default, most items don’t have them.  That means if you drop 3d object in your scene, position it, orient it and align it and then run your game and your game logic moves the object, if you did not set initial conditions the position and orientation of the object when you save is the value that’s saved as well as the value used when you restart the game again. To prevent this you select any objects which need initial conditions and select “Set Initial Conditions”.

You can set initial conditions on almost anything, for example a 3D mesh. You wouldn’t normally need initial conditions (IC) on a 3D mesh since most likely you would not adjust the mesh at runtime but if you do adjust it at runtime you’d better save IC on it.

Another example is Arrays. If your arrays are just static data then you don’t need IC on them. If on the other hand, some cells get updated during runtime you might need to save IC on the array. Once you’ve saved IC on an array though, that is the state that will be saved to the file. If you adjust a value and forget to Set the IC again the new values will not be saved.

Saving Pieces

You can save almost anything. For example if you setup an Array, select it, right click it in the Level Manager and pick Save As… and you can save it to a file which can then be loaded into another scene. If some things are used together select all of them together before you save.

Flexibility

Take a look at all the sample BBs. Virtools has examples of using pixel shaders and other technical examples as well has physics examples with the Havok physics pack including the standard simulations and also car simulations making it easy to get started on a vehicle based prototype. Their A. I. pack has a small 3D RTS game where you can drag select multiple characters in 3D and command them around. It’s a great place to get started with an RTS prototype.

In the real world

If I discount the learning curve, I was able to make a prototype for our game in about 8 days. I think that is far faster than I could have done it most other ways.

There were some issues. Virtools’ current character animation system is fairly simplified. I needed to be able to apply multiple animations to a character with full control over the specific frame of each animation I want applied. Virtools didn’t support this yet. I found a kind of hacked workaround but it has serious limitations. If I start prototyping a new game I will have to seriously consider whether or not I should spend the time to write a new character animation system BB. I’m not sure how much time would be involved in that so I hope they will provide a new one soon. They do provide the source code to the current one so it might be a simple matter of going in and adding some pIns for inputs that are not currently exposed.

Another issue is one of updating. Virtools allows you to manually re−import your assets but unfortunately it’s that manual bit that needs to go. In real development most of us are used to putting the new assets into the build and having them just get used, no manual intervention required. I’m sure they are working on that issue. Some of it may have been solved with their Alienbrain integration. Unfortunately I don't have Alienbrain so I didn’t get a chance to check that part out.

The 3D exporters for Max, Maya and Lightwave, while capable have some serious limits to there usefulness for a full production product. For example there is no automated re−export so if you add a node to a character you’ll have to manually re−export each and every animation. As well there is only linear function curve animation (no curves there) or sampled animation. The ideal would be something more like Granny3D that samples first and then generates function curves from the sampled data. Also, there is no way to specify which nodes/joints in a character need animation on a per joint / per animation basis so small secondary animations have to have all that kind of information applied at runtime. I could go on as I have a particular personal button with exporters. See my article on 3D exporters. Fortunately Virtools provides the source code for their exporters so if they don’t step up and provide production ready exporters there is the possibility you can write your own.

Also, as cool as the visual language is it can sometimes be cumbersome. Like I showed before, expressing expressions can get large. While there are workarounds, sometimes your schematics and get pretty large and hairy. You can break them down into BGs kind of like breaking down a large C++ function into multiple smaller functions but ultimately visual editing may not be for everyone. One thing that would help is a better auto formatter. I’m sure it’s a hard problem, but if you want to insert some code and you want to keep your BB understandable you need to select all the stuff to the right and move it. That’s not too big a problem, the bigger issue is that if you move only a few pieces Virtools will automatically reformat some of your links and often it will reformat them so that your schematic is no longer readable at a glance forcing you to manually format your links.
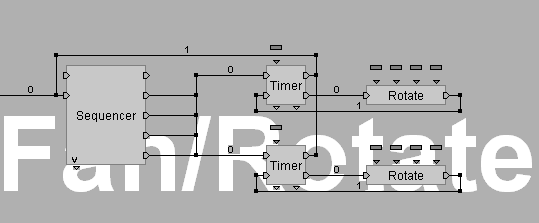
figure 8

To give you an example there is sample with an oscillating fan. It uses the Sequencer BB but looking at the schematic as in figure 8 it is not at all clear how it’s working until you start dragging the links around and you can see that what made no sense is actually overlapping links. Once you un−overlap them as in figure 9 it will make sense but drag any individual BB and the links will snap back to unreadable and overlapping.
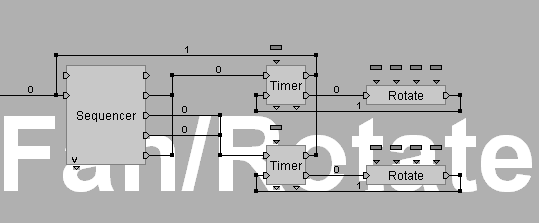
figure 9

I don’t mean to come down in Virtools. Most of the issues above can be resolved either by adding your own plugin or modifying one that comes with it.

Real Production

I’ll be honest, when I first heard about Virtools I was interested in it for real production more than prototyping. While I can 100% recommend it for prototyping, in my opinion it is unfortunately not ready for real production yet mostly due to the issues above. I know they are working on it. Version 3 adds integration with Alienbrain for supposedly better asset m anagement.

Another big issue would be code re−use and sharing. If you were making a character action game ala Mario and you had one person programming the goombas and another person programming the koopas, as it is now, Virtools has no way I know of to share those behaviors across levels. When they figure out an elegant solution for that issue it will go a long way to making Virtools more than just a prototype or small project tool.

I haven’t gone this far yet but Virtools is designed so that you can replace the renderer. This would allow you to adapt it to some specialized system like a location based system for example. I’ve even heard that Virtools has their runtime engine running on a PS2. I’m sure there are several categories of games that could work there.

The Future

The thing is, it’s clear to me that on the next generation of consoles (Xbox2, PS3, Gamecube2) the systems will be powerful enough that the overhead of using a tool like this will not be the difference between your game performing well or not and in fact it might just be the opposite, if you don’t use a tool like this you might not have the time and flexibility to tweak your gameplay and add all the features to the game that you want so, regardless of whether or not you end up using Virtools I think it’s important for you to take some time to evaluate it and learn what development could be like in the future.

We’ve all seen how easy Flash has made 2D development. Games that used to take months can now be made in Flash in days. Virtools or something like it is set to do the same thing for 3D games. It’s in that vain I recommend you take a look.
Comments

Game Software Localization

2004-01-20

One of my past responsibilities has been localizing game software before both from the point of view of the person writing the original code and planning for localization and from the point of view of taking a finished product from another team or company and trying to localize it.

It is surprising to me just how poorly some code is written in this area. Of course I suppose it's normal that many people just don't think it through or don't have any incentive to try but in this day and age each of the major markets, America, Japan and Europe generally account for 1/3 each of all your sales and now Korea, China and Taiwan are coming on board it's even more important to take localization seriously including preparing in advance and trying to think through all the issues to make it as painless as possible.

For example, storing strings directly in the code is BAD! How the heck are you going to find those in order to update for different languages. Another issue can be way you code to present things. Read this article for the nightmare that languages can be. It will help you realize some of the issues of hard coding the wrong kinds of things and the types of messages to avoid.

Design your data to make it HARD to mess up. I've seen code like this

struct GameDialog
{
    int type;
    int numLines;
    char* msg;
}

GameDialog theDialog[] =
{
    { MSG_REGULAR, 3,
      "Welcome to \"Megaland\"\0"
      "I will be your host,\0"
      "Joe Bob.\0"
    }
}

To localize the code the company that wrote this sent the source code out to the translators and asked them to fill in the strings for about 30000 lines of dialog for an RPG game. Let's count the ways this is bad

  1. The strings are in the code.

    In code punctuation is important. Translators are not coders. They have no idea that all those quotes, brackets, commas etc are important

  2. The number of lines per message is hard coded.

    Again, the translators are not going to know that they need to change that "3" to a "4" if they add a 4th line. Even if you tell them they are bound to make mistakes.

  3. The lines are hand word wrapped.

    You may tell the translator your game can only display 20 characters per line but asking them to hand count characters is asking for errors.

  4. The lines are line broken with '\0' (NULL).

    The code that used this data looked at the number of lines, 3, and then searched for the strings by finding the NULL characters inserted by '\0' and of course there is an extra one at the end of all of it. If just one '\0' is missing the code will most likely crash since the last string will be some random data. If the translator accidentally deletes a '\' the '\0' becomes just a 0 like the zeros in "Beverly Hills 90210" and again the code will either crash or mess up.

  5. The quotes around "Megaland" have to be escaped.

    If they aren't the code will not compile. Are your translators going to remember this? This can be compounded by the fact that the translators might use true “quotes” which if they have a \ in front of them are not going to become what you expect.

  6. If you are going to translate to any multi-byte character set (i.e., Japanese, Korean, Chinese, ...) most compilers will have trouble with the strings. The reasons are varied but a simple example is the compiler, reading the strings one byte at a time, may find a character like a " inside a multi-byte character that it should not interpret as a quote.

There are many solutions. For example, for the number of lines problem and the word wrap problem you could do word wrapping on the fly at runtime. Maybe you think that will be too slow, fine, write a tool and takes the data from the translators and word wraps it at compile time. Don't force the translators to word wrap.

As for the others, if you take the tool route your tool could not only word wrap and/or count lines, the quotes and puctuation in the data are unlikely to be an issue if your tools write out the data that is stored in some kind of binary format. If you write to an intermediate format like C source your tool could escape the quotes and print the correct punctuation. If the characters are multi−byte it could escape the strings to "\x??\x??" format, that way you don't have to worry about the compiler choking on the multi−byte characters

Your tools should even check if the text fits. Why make people manaully check this? Especially if you are making an RPG or other game with tons of text, if you have some kind of display and you need to make sure that the text is a certain size or less then put that check in your tools where it can check all 40000 paragraphs of dialog instead of asking your testers or localizers to check it all by hand. If parts of the text are variable like a name then have your tool find the longest name and test with that.

On one project I used text files to give to the translators and I wrote a program to take those text files, parse them and spit out a string table, one for each language. The text files looked something like this

#
#
# Greeting:
# This is where the main character says hello to the player
#
# original English
#
# Hello <player> Are you having fun yet?
#
Greeting:
Hello <player> Are you having fun yet?

#
# Goodbye:
# This is where the main character says goodbye to the player
#
# original English
#
# Well, I really gotta go now. C ya!
#
Greeting:
Well, I really gotta go now. C ya!

I made this file for English and then saved it out 7 more times. Once each for Spanish, French, German, Dutch, Italian, Portuguese, Japanese. I then sent the files out with instructions to edit the appropriate lines and I wrote tools to take these text files and generate a string table from them, one for each language.

In the build process, at compile time, I would find the size of the largest string table and that size would get built into the code so that the code could allocate one buffer large enough for the largest string table. Then, at runtime, the user could pause the game at any time, switch languages and I could load the different string table into memory and know there would be enough memory for it. No need to free and/or allocate memory. This made it great for testing as well since they testers could pop up the debug menu and right in the middle of a dialog/text message they could switch languages and double check things.

It went relatively smoothly. The only major drawback to this method was that text files can get messed up pretty easily. Some translators translated both the line they were supposed to change AND the original English which was there for reference. Not a big deal since it was just a copy and paste for them but the whole point was as a reference to the original for anybody that needed to look at the translation. For example a programmer that has no idea what "私は馬鹿なアメリカ人です" means and therefore needs the English reference as to where it goes in the game.

The other was a few translators used a text editor that word wrapped lines automatically. This messed up any long messages since my tool assumed if the translator split the line they wanted that line split in the game.

The way I've gotten around that since then is to use Excel. Excel stores all of it's data in Unicode so handling languages like Korean, Chinese and Japanese is not a problem. It also fixes the issues of the original lines because you can just protect those cells so they can't be edited. On top of that the word wrapping issue disappears since you just allow one cell per message.

The only problem with Excel was figuring out how to get the data out. I've seen many teams that use Excel and write complicated excel macros to extract the data. That doesn't seem like a good idea to me. One reason is you are probably going to send out 6−10 excel files, one for each language to different translators. You'd most likely have to put the macros in each of those files. If you changed something later you'd have to edit the macros once in each file. Another issue is that in this age of macro viruses many translators' machines will warn them about excel macros and freaking out they will delete the macros. Plus, even if they don't delete the macros you can never be 100% sure they didn't some how go in and change something by accident giving you one more thing to debug later.

The solution is to write a tool to extract the data from excel. Fortunately excel has extensive OLE support. You can use this from any language. My preferred language for this sort of thing is perl. As of version 5.8 perl has great unicode support and it just mostly works, no futsing around. Perl can also convert to other encodings with a single line of code so if that's important for you you can do that.

Here's the main lines to pull out a single cell.

#!/usr/bin/perl
use strict;
use warnings;

use Win32::OLE;
use Win32::OLE::Variant;

# set perl's OLE module to return Unicode
# if you don't do this perl will convert to the current locale
Win32::OLE->Option(CP => Win32::OLE::CP_UTF8);

# get the Excel Application
my g_xl = Win32::OLE->new('Excel.Application', sub {_[0]->Quit;});

# open the file. Note that excel requires a FULL path and it requires
# backslashses
my xlFileHandle = g_xl->Workbooks->Open("d:\\folder\\myexcelfile.xls");

# look up sheet1 by name.
my xlSheetHandle = xlFileHandle->WorkSheets("Sheet1");

# look up an individual cell
my xlCellHandle = xlSheetHandle->Cells(12, 3); # cell C12

# get it's value
my uni = xlCellHandle->{Value};

# there is some voodoo here. I'm sure some perl guru can explain
# if I just use uni directly things don't work!?!?
my string = uni;

Of course the code above doesn't check for errors, it's just a sample to get you started.

One other thing about excel and game messages. Sometimes you are just writing paragraphs that can be word wrapped automatically and sometimes you need specific word wrapping. For example

You found the prize!

Congratulations!

You can insert lines in a single cell in excel using ALT+ENTER. You might need to send that little piece of info to your translators.

Here's a few tools I wrote that might come in handy. One is a tool for extracting a single column out of excel and save it to a file in the encoding of your choice. The other is a tool that extracts individual cells based on a template you specify. It may be suitable for generating data for some other tool to compile into a string table. Even if they are not directly useful for you they may be good examples although they have not been used extensively and may be incomplete in areas 😖. (Note: right click the links to save them)

Both are command line tools. If you have perl installed, which you can get here, you should be able to run them from the command line just by saving them with a .pl extension and then typing their name while in the same folder you saved them in. If you add a −−man as an argument as in

xlextractcolumn.pl --man

they should print out some simple documentation.

Another problem I've seen is putting more than the strings in the file for the translators. For example I worked on a product where they had setup an extremely complicated excel spreadsheet with a name and about 57 stats for each monster. They had an elaborate macro to write out all of the names and stats into a C file which got compiled into the game. To translate they sent the excel file to the translators. When they got it back they just ran their macro to spit out a new C file. Well, guess what, they have NO clue if the translators accidentally changed one of those stats and that could take months to debug like your testers find out the user can never kill the big dragon in level 12 because the translators accidentally changed its hitpoints from 1000 to 10000. Don't give the translators more than they need or your just asking for trouble.

In a similar way, I saw a project where they had special editors for everything in the game. For example this particular game had lots of robots. They had a robot stat editor written in C++ using MFC and Windows dialogs with little boxes and checkmarks for all the stats for all the robots. Included in the tool was the a box to type in a paragraph of text to describe the robot. All of the data was then saved out into their private binary formats.

There were two issues. One, there were no docs on how to run the tools to regenerate the data. I'm sure there probably were never any docs even on the original team. Instead the programmer that made the tool just explained person to person how to use the tool and it was never documented. But, worse, we're back to the same problem. If we sent that tool off and asked the translators to translate the descriptions we have no guarantee they won't accidentally edit some stats. We also now have to explain to 6−10 translators in different countries how to use these tools which have menus and buttons and labels written in only one language, not the native language of the translator, and that most likely run on only one type computer. (i.e., the translator might not be running Windows)

Finally, if you have any special codes that need to appear in the text my current thinking is you should do this the HTML way. For example let's say you had the string "<player> takes damage from <creature>". I think it would be better specified like that, using <player> rather than %p or %c or something more cryptic. The more cryptic way seems more error prone for non−coders and your tools can always convert <player> and <creature> to something more compact like %p etc. That also means if the text says "<player> does <percentdamage>% damage to <creature>" you can properly escape the actual % that the translator wants printed as opposed to a more traditional way which would require the translator to type "%p does %d%% damage to %c" where the translator would most likely not know to type the double %. On top of which, it should be easier to check for errors. If you are using single character % codes then it would be easy for the translator to mess up but if you use something like <player> and the translator types <player> it will be easy for your tools to notice the problem and inform you about it.

The same might go for formatting as in <center>Hooray!</center> or <red>blood</red> etc... Those kinds of things might argue for using something other than Excel like an HTML editor but an HTML editor would have many of the same problems as a text file being so free form.

This article has really only covered text and there are a host of other issues involving voice and graphics. Voice should be relatively obvious with a little thought. Graphics are something the artists generally making the graphics don't think about. If you go putting up billboards or signs or graffiti throughout your game all those textures and graphics may have to be translated. You can make a conscience decision to avoid words in your graphics. If that is not an option, you know at least that all those textures that have words that will need to be translated, need to be tracked, marked, put aside. You'll want to keep the original working files, the photoshop files before they've been flattened and exported, the ones with all the effects and layers still around so it will be easy for the localizers to try match the original style. You'll also need processes for getting your data rebuilt with the new translated textures and it is going to have to be documented for the people doing the localization or if the original team is doing it you'll need to design processes to build the various versions of the data that use these different image files. Maybe you really should avoid putting words in your textures.

I hope you find some of these ideas useful. I would like nothing better than to never have to worry about these kinds of localization issues again because everyone started taking stuff like this into consideration early in development. It's good for you on many levels. You'll save money because localization will go more smoothly, you may only have to pay for translation instead of also paying for localization since you already thought of the issues, you'll stop more grey market sales since the faster you can localize the faster local versions will ship, and you'll be less frustrated with all the small back and forth issues that come up since you'll have created something that by design has less chances for mistakes. 😊


PC vs. Console programming

I should mention since this will probably come up, On Windows and the Mac the default way of handling localization for applications is resource files. You put the graphics and strings for each language into your resource file for the application and the operating system handles the rest. It will load the correct strings for the user's current language automatically on demand and hand them to you.

While that may be fine on a PC that uses a hard drive, virtual mem ory, and a ram cache for reading CDs/DVDs a console doesn't generally have all of that. There is no cache, no virtual memory, there may or may not be a hard drive and when you want to display a string you want it immediately, not 0.1 to 5 seconds later. No cache means reading the DVD/CD is slow. No virtual memory means that managing memory is important so having some OS like service go off and randomly allocate some memory is generally something you need to avoid. Also often you are using the DVD/CD for music or video but if all of a sudden that has to be interrupted to get a string something's going to break.

On top of which most resource editors are really not designed for non−technical people to use. They are not going to word wrap for you, they are not going to pre−compile to %p or some smaller more memory efficient code. So, at least for console games, I would recommend rolling something yourself rather than relying on trying to emulate PC/Mac like resource files.


Update: Based on a suggestion from my friend John Alvarado at Inxile Entertainment an argubly better way to use data from Excel is to just export the data as XML and then you can use the myriad of ways to parse XML to get to the data. Nearly every computer language supports XML and by default Excel exports in unicode so all languages should be covered. Here is some example code so you can automate the exporting part.

#!/usr/bin/perl
use strict;
use warnings;

use Win32::OLE;
use Win32::OLE::Variant;
use Win32::OLE::Const;
use Data::Dumper;
use File::Spec;

# set perl's OLE module to return Unicode
# if you don't do this perl will convert to the current locale
Win32::OLE->Option(CP => Win32::OLE::CP_UTF8);

# get the Excel Application
my g_xl = Win32::OLE->new('Excel.Application', sub {_[0]->Quit;});

# get Excel's constants
my xl = Win32::OLE::Const->Load(g_xl);
#print Dumper (xl);

{
   my srcFilename = ARGV[0];
   my dstFilename = ARGV[1];

   print "converting srcFilename to dstFilename\n";
   # open the file. Note that excel requires a FULL path and it requires
   # backslashses
   my xlFileHandle = g_xl->Workbooks->Open(srcFilename);

   # look up sheet1 by name.
   if (-e dstFilename)
   {
      unlink (dstFilename);
   }
   xlFileHandle->SaveAs(
      dstFilename,
      xl->{'xlXMLSpreadsheet'}
      );

   xlFileHandle->Close;

   undef xlFileHandle;
}

undef xl;

g_xl->Quit;

undef g_xl;

I used this for Tanjun'ka and instead of using an actual XML parser I just used some simple regular expressions to pull out the data. At the time I didn't know much about parsing the data with the XML parser in C# and I figured that with schemas etc I'd probably run into exceptions and other things that I wasn't ready to deal with so I opted for a simple solution. If it bites me at some point I'll switch to the full parser but for now this seems to be working. The format of my Excel files is as follows. One file per language that looks like this

Label Text Notes
LanguageLabel 日本語 Name of this Language
ToolStripNew 新規作成 "New"
ToolStripOpen 開く "Open"
ToolStripSave 保存 "Save"
ToolStripCut カット "Cut"
ToolStripCopy コピー "Copy"
ToolStripPaste 貼り付け "Paste"
PhotoRevert リセット "Reset" : Photo Bottom Buttons
PhotoUndo 取り消し "Undo" : Photo Bottom Buttons
PhotoRedo やり直す "Redo" : Photo Bottom Buttons
PhotoTabCrop 回転/切り抜き "Rotate/Crop" : Photo Tab
PhotoTabBright 明るさ "Brightness" : Photo Tab
PhotoTabHue Hue/Saturation "Hue/Saturation" : Photo Tab
PhotoContrast コントラスト "Contrast"

Then, to pull out the data I just parse the file and put all the values into a hash/dictionary based on the labels something like this.

using System;
using System.Collections.Generic;
using System.Text;
using System.Text.RegularExpressions;
using System.IO;

namespace Tanjunka
{
  class Util
  {
    private Dictionary<string, string> GetLangDict(string filename)
    {
      Dictionary<string, string> lang = new Dictionary<string,string>();

      string str = readFileToString(filename);

      Regex r = new Regex("<Row.*?>.*?<Cell.*?>.*?<Data.*?>(?<1>.*?)" +
            "</Data>.*?</Cell>.*?<Cell.*?>.*?<Data.*?>(?<2>.*?)"+
            "</Data>.*?</Cell>",
            RegexOptions.IgnoreCase|RegexOptions.Compiled);
      MatchCollection mc = r.Matches(str);
      for (int ii = 0; ii < mc.Count; ii++)
      {
        Match m = mc[ii];

        if (lang.ContainsKey(m.Groups[1].ToString()))
        {
          Console.Writeline("** duplicate entry for label(" +
           m.Groups[1].ToString() +
           ") in language file " + filename);
        }
        else
        {
          lang[m.Groups[1].ToString()] =
            UnEntify(m.Groups[2].ToString());
        }
      }
      return lang;
    }

    private string readFileToString(string filename)
    {
      StreamReader sr = new StreamReader(filename);
      string s = sr.ReadToEnd();
      sr.Close();
      return s;
    }

    private string UnEntify(string str)
    {
      // replace common entities;
      str = Regex.Replace( str,  "&lt;"  , "<"  );
      str = Regex.Replace( str,  "&gt;"  , ">"  );
      str = Regex.Replace( str,  "&quot;", "\"" );
      str = Regex.Replace( str,  "&nbsp;", " "  );
      str = Regex.Replace( str,  "&amp;" , "&"  );
      str = Regex.Replace( str,  "…"  , "...");

      return str;
    }
  }
}

C# defaults to reading that file as Unicode so except for things that excel itself escaped it just seems to work.


Also see this page for some really simple perl.

Comments

Making Games 1.5

2003-10-06

I thought it was time to update this article and maybe try to finish it. It's been 5 years since I wrote the original and lots of stuff has changed.  In particular it's even more work now than it was then.  Budgets for games are 3 to 5 times what they were then.  So, here is "Making Games Version 1.5"


Do you know what it really takes to make a video game? Do you know why a game costs $60 or even $80. Making a game takes a ton of work.

Sometimes I think I should try to teach a class in it in high school. Creating a game might be something that some students might want to do and having a class about it would allow them to experience what it really takes to make a game. It's not just about having fun, it's about lots and lots of work. It's about reports, schedules, budgets, tradeoffs, teamwork. All the things I wasn't taught in high school or college for that matter.

Pitching

Most people think that a game starts when someone has a great idea for a game. The problem is that almost everyone in the industry and every game player thinks they have a great idea for a game. Someone has to be convinced that your idea is the one idea that should get done. This is done by pitching the game whether you're an internal team (a team that is internal to the game publisher) or an external development team (a team not owned by any publishing company but that does products on contract for a publisher.)

To pitch a game you have to create pitch materials. The better your materials the better your chance of getting your game approved. Usually the minimum materials are a small report 2 or 3 pages describing the game briefly. If you can't describe the game briefly then you are unlikely to be able to keep the attention of the people you are trying to sell the game to. Most of them are not game players. Another common pitch material are storyboards. Storyboards attempt to show the game with pictures. Good looking storyboards definitely make an impression over those teams that don't have them. Even better than storyboards is an actual demo of the game. With technology for making games relatively easy to access many publishers won't even talk to you without a demo these days.

Time and Money

What many people don't realize is that the game they pitch must be able to be done in a certain amount of time within a certain budget. Lets say you wanted to make a 3D Fighting game with 20 different characters and 1 background for each character. An intro video introducing the game and a video ending for each character when that character wins the game.  In other words you want to make Tekken.  How much time and how many people is that going to require.

Lets guess that each character will take 1 month to create in 3D and animate. Each background also takes 1 month. The 3D programming we guess will take 1 year. The intro video will take 4 months and each ending video will take 1 month. Add it up.<ul>

  • 1 month 20 characters = 20 months
  • 1 month 20 backgrounds = 20 months
  • 1 year of programming = 12 months
  • 1 intro video = 4 months
  • 1 ending video * 20 characters = 20 months
  • That's 20+20+12+4+20 = 76 months. In other words, if one person could do all the work by themselves it would take them 6 years to make the game. Of course 6 years is too long to take to make a game. If you started today, in 6 years the video game systems that people have at home would probably have been replaced. Instead of a Sony PS2 they'd have a PS3 or maybe even 4 and your game would have no market anymore.

    Most publishers would like a game to take 1 year. So if you wanted to get your game done in a year you're going to need at least 7 people. 76 months / 7 = 10.8 months or almost 1 year.

    How much do 7 people cost for a year? Well an artist can cost anywhere from $30,000 a year to $100,000 a year depending on their experience. A programmer from $40,000 to $100,000. Lets just guess and assume you get 6 artists for $45,000 each and one programmer for $65,000. That's $45,000*6 + $65,000 = $335,000. But wait, people need benefits like health insurance, they need supplies like paper and pencils. They need a place to work like an office with a desk, a phone and a chair. You also have to pay certain taxes in addition to the taxes that each person on the team pays. All that adds up to around 30% of their salary. So, $335,000*30% = $100,500. Your total cost is now $335,000+$100,500 = $440,000. Okay, now you need equipment and software. Each artist and programmer needs at least one computer. A reasonable computer with monitor will cost at least $3000. Artists need software and 3D software can be very expensive. Lets say you decide to use 3D Studio Max. That's $3500. They may need a copy of Photoshop or some other painting software which is about $600. Your programmer will need a an editor $200, and a development system, $30,000. So the total for equipment so far is

    Total so far, $516,500.

    Now lets say you ask a publisher for $516,500 and they agree to give it to you to make the game. What did you forget? Well some things that come to mind, music and sound effects for one. Also, your schedule probably didn't take into account all the communication that needs to go on between team members so they are all working as a team. Do you need someone to lead the team? Do you need a art director to organize the artists and make sure that all the artwork in the game has a consistent look? You could ask one of your 6 artists to do it but then they will be busy managing the other artists and won't have as much time to get their work done. Who is going to pay the bills, do the payroll, order the equipment and software. Whoever does it will have less time for working on the game. What about a network? Are you going to have a network so that people can share there work with each other without having to use lots of floppy disks?

    Lets add one more artist as art director and because they are the art director they command a higher salary of $60,000. You also hire a producer or manager to both organize the team and pay the bills and manage the other money matters. (Maybe you don't like the idea of hiring a manager and instead you want to manage. Now your time is taken up by managing so you are going to need to hire someone else to do the work you no longer have time for. Either way it's going to require another person). You need to contract out for music and sound effects. That can easily cost $60,000 to $80,000.

    Lets add that in.<ul>

  • 1 art director = $60,000 + 30% for rent, insurance, taxes, supplies, ... = $78,000
  • 1 producer = $40,000 + 30% for overhead = $52000
  • Music and sound fx = $70,000
  • 2 more machines = $3000 * 2 = $6000
  • 1 more 3D Studio Max = $3500
  • 1 peer to peer network = $4000
  • New total = $4000+3500+6000+70000+52000+78000+516500 = $730,000

    Lets say you ask for $730,000 from a publisher and they give it to you. You now have enough money to pay your team for exactly one year and no more. If you forgot something tough luck. If it takes 16 months instead of 12 you're going to go hungry for 4 of those months or your going to have to re−negotiate with your publisher and they are going to want something in return for your failure to deliver your game within the time and budget you originally promised. They might for example lower your royalties or they might demand a part of your company. They might ask you all to take a 50% pay cut until you finish.

    Lets take a look at royalties. Most games by external developers are done on an advance against royalties arrangement. That means that the $730,000 they gave you is an advance against your royalties. Maybe you got 15% royalties and the game sells for a suggested list price of $49.95. You don't get 15% of $49.95. You get 15% of net so if the list price is $49.95 the wholesale price is probably 45% of that or $22.48. If this is a Sony PS2 or XBox game I think they both charge around $8.00 per disc sold as a licensing fee so the net price is $14.48. 15% of that is $2.17. Your team gets $2.17 per unit sold. You got an advance of $730,000. $730,000 / $2.17 = 336,406 units. You must sell 336,406 units before your team will see any more money than they already got. Not very many games sell 336,406 units. Maybe only the top 10 games on any platform.

    Another issue that comes up here is the feeling that the publisher is being greedy.   The typical point of view of the developer, you, is that you are going to do all the work and they are getting 85% of that $14.48.  You feel like you should get more.   I know I often felt this way.  Here's the other point of view.  From the view of the publisher they put in $730,000 and probably several $100,000 more on marketing and plus they also need to pay sales people and marketing people and producers etc.   Lets say they spent a total of $1,500,000 on your game.  What have you spent?   You've spent $0.  They are risking $1.5 million dollars on you.  If you or your team fails they are out $1.5 million dollars.  On the other hand you risk nothing.  If you fail you already made $730,000 dollars.  That hardly seems fair.  The reason they get all the money is that they are the people taking all the risk.  That actually brings up another point, if you want a better deal, lower their risk.  For example if you develop the game entirely on your own and then once it's finished you go to them and they decide to publish it you can usually get a much better deal.  The reason is that they don't have to risk as much money.  Of course they still have to risk all the money they will spend of advertising and duplication and distribution and sales.  Unfortunately most people can't make a product on their own.  It takes too long and too many people.

    Design

    Design is going to be different for different types of games.  For the type of game I like to make, action games or action adventure games, I personally believe the best way to design is by storyboard and sketches.  I've seen teams make huge documents 300 to 400 pages long for their games and I personally don't think it works.  Nobody wants to read a 300 page document.  Instead you probably need some kind of outline just so you can make sure you've got everything listed.  Then you need to design each world and each character and each object.  Each item will need two basic things, a visual design and a behavioral design.  The visual design would be designed by the artists.   This is one way to get your artists involved in the game.  Give them a basic idea of what you want to do with the game and then give them a couple of days to go off and sketch settings or characters or objects.  Then have a big meeting and decide together which of their ideas the team wants to actually use in the game.  Once the team has chosen the artists can make much more detailed color version of those items.  You see this type of thing in movie production.  The #1 reason you need this is you need to make sure everybody understands what everybody is trying to make and a visual picture is your blueprint.  In other words, "make what you see in the picture".

    The perfect example of this is the original Star Wars.  If you look in to the making of Star Wars you will see lots of paintings by a guy named Ralph McQuarrie.  I used to think those painting were made after the movies since they looks so close to scenes in the movies but actually the opposite is true.  Mr. McQuarrie drew those paintings and then from those paintings people made the movie.  If you think about it you can see why this is so important.  It takes lots of people to make movies and video games and without images like these nobody will have the same idea for how to make their particular piece of a level or scene.

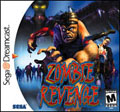
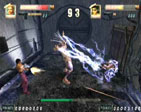
    Secondly you need behavioral design.  This is best done with sketches.  In the movies this would be the black and white sketches that show each scene and camera angle.  In a game these would be sketches that show each item and character and all their moves and behaviors with notes giving details for things like timing, speed, distance, power etc.  While working on Zombie Revenge at Sega I saw hundreds of these sketches.  Every motion needed for every character had a sketch describing the motion BEFORE the motion was created.

    Levels also need to be sketched.  These should look like blueprints or top down maps that show where each item/door/character etc should be.  Having worked both ways I personally believe levels should be laid out on paper by game designers and THEN those designs should be handed off to artists so the artist can build the level based on the game designers blue print.  This lets the game designer make sure the level is designed to be fun, fair, not frustrating, etc and lets the artist make it look beautiful.   Some of you are going to think you can just jump into a map editor or 3d program and start creating a level.  It could happen but I've never seen a really good level come out this way on time.  The problem is without a blueprint you have no idea where you are going or when you're done.  You'll just keep noodling and noodling until you get bored and start working on something else.  If you have a blueprint you'll have a specific goal in mind.  You'll know when you are finished and when you are not.   You'll know what other things need to be created for the level before the level is even built.

    The successful companies where great products are made on time the designer is at the top of the heap. From the designers the game is made.  That means they must be good people capable of leading, of creating designs that are possible, of not creating frivolous un−thought−through designs that the team implements and then have to be thrown away.  They need to be aware that from their designs, thousands of dollars will be spent implementing them and that bad decisions from them will cost lots of money and possibly the entire project.

    Another issue with design is keeping your design within your allotted budget and time.  Money and time are not unlimited and you can't have every feature you think you want.  One approach is to design with the ability to cut things in mind.  Maybe you are making an RPG and there are 10 side quests.  You should leave implementing the side quests the main quest is finished.  Then you start making the side quests.  That way, if you run out of money you can ship the game with only some or none of the side quests.  Sure, to you and the team you'll be frustrated and sad that your great ideas for side quests did not make it in the game and you'll feel the game is less than it should be but the player may not.  The don't have a vision of the game with all your side quests in it.  There vision of the game is what they see when they first play it and so they will not be missing these things.

    In that vein, as you design you should design from most important elements to least.  If you are making a character action game then the main character is #1.  What can he do?  What are his moves?  Next you should design a couple of levels.  You need to flesh those levels out.  Finish them before you move on to other levels.  Another suggestion, don't start with the first level.  You and your team will not be doing your best work when you are just starting and don't have a feeling for the game and all the processes and tools used to make it but you want what the player sees first to grab their attention so pick some middle level or area to do first and then after you've done a couple o f stages then go and do the first level.  This way your first level will be better than if you had done it first.

    Also, in the same way is saving the side quests for last, get your game shippable as soon as possible.  Get 2 or 3 levels running and then get all that other stuff in, glue screens, options screens, inventor screens, memory card or saved game stuff, network play, whatever it is.  Put the sounds, the voice, a cutscene, music, everything.  Until you've done it all you don't really know how much work you have ahead of you.

    Programming

    Programming is getting both harder and easier than ever.  Easier because today's systems are powerful enough that you can buy an engine for them.  Rendeware, Alchemy, etc.  Harder because now there are so many more parts then their used to be.  Physics, shaders, networking, hard drives, encryption, multiplayer modes, rumble paks, gameboy advanced options, co−processors, AI, etc etc etc.  It used to be that a couple of programmers could do the entire game.  Now if you look at the job listings each position is specialized.  Server side network programmer, client side network programmer, physics programmer, sound programmer, sound tools programmer, 3d engine programmer, game programmer, AI programmer, 3D tools programmer, content management programmer.

    As another example here is an incomplete list of some of the programming tasks that have to be done

  • AI
    • Collisions

      Collisions are another huge element of games especially with so many polygons in the worlds often an entire separate database is needed for collisions.<ul>

    • Collisions with background

      just like the graphics, collisions with the background require optimizations to quickly figure out which parts of the background you need to check.

    • Collisions with other objects

      Object need to check for collisions too and checking all objects against all other objects is usually too slow again requiring a system

  • Physics

    The latest games are starting to require physic engines.  This is hard math and it is extremely hard to get it all to run fast and still not mess up.  For example the physics and collisions in Halo are great but there are bugs.  Play 16 player Oddball and watch as the ball sometimes falls through the floor.  In fact if you want to find the physics and collision bugs in most games put a bunch of objects or creature into some corner of a room and then try shove them all into the corner.

  • Path finding

    This used to be something only Realtime Strategy games used like C&C or Warcraft but now even platform and FPS games use path finding so that the monsters don't get stuck on walls, rocks, trees and crates.

  • Event Systems

    Many games use an event based system to allow objects to communicate with each other.  For example a switch telling a door to open or a light to come on.  The event system itself is not hard to write but often tools need to be written to make it easy for designers to setup the events.

  • Object System

    Most games have an object system.  A system that tracks all the things that move in the game.  This can be as simple as just a list of things with pointers to a "processMe()" function or as complex as generic objects that have all kinds of attributes like weight, size, position, etc and a complex system that runs them all.

  • Non Player Character Code

    If your game has lots of characters there can be lots to do here.  Gex for example had over 350 separately programmed objects.  But even if your objects are few like Halo you may make each object extremely flexible and interesting which is a whole other bunch of work.

  • Scripting

    Many games use a scripting language.  Someone has to make that language, integrate it into the game, provide debugging functions, make a compiler, check for errors, and teach everyone else how to use it.

  • Main Character or Player code

    Someone has to program the player, reading the controller and making him go through all his moves.  That alone can be a 6-9 month job especially if he has lots of moves.

  • Controllers
    • reading the controller

      reading the controller is generally easy but not always.  For example on the PS2 the PS1 inside reads the controller and sends the data across to the PS2.  On top of that there is the issues of forcing the controller into Dual Shock 2 mode.  There's also remapping options that have to be written, etc.

    • recording input for playback

      Sometimes you record input so you can play it back in the game.  Sometimes you record it so you can play it back for finding a bug.  If it's for in game playback you might need to compress it on the fly in order to save memory.

    • dealing with rumble issues

      modern consoles all have vibration built into the controllers.  Here's another set of routines you need to write.

    • calibration

      Some games allow calibration, especially for things like light guns.

  • Sound

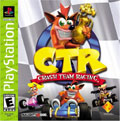
    Sound can often require a programmer doing nothing but sound programming for an entire project not just because there is programming to do but often there is lots of data.  Crash Team Racing had character sounds for 6 different languages all on the same disc and they were played off the CD as the game was playing.<ul>

  • Sound effects

    You need to be able to get lots of sounds into the game and play them back in a variety of ways.  Although many sounds are easy like explosions, other sounds require more direct control like an engine sound.

  • Structured Music

    By structured music I mean midi or mod music, music that is generated on the fly.  More and more people are finally realizing that streamed music doesn't really work well for many genres since it's not instantly available and it makes it hard to load stuff during a level.

  • Streamed Music

    Streamed music is like playing a song off a CD or an MP3.  Dealing with streaming music and still allowing data to load can be another big issue.  Gex did this as does GTA3.

  • Video

    Many games use video now and there are issues here as well

    • Basic playback

      For many games this is all they need.  Just the ability to play a full screen video cutscene

    • Ingame playback

      Other games require in game playback which has other issues.  Amplitude does this for it's billboards.

    • Special options

      And there are a host of other things that might come up.  Just like when playing video over the internet there is a wait while it's "buffering".  The same thing happens on video in games.  On some games that buffering was not considered and so when there is a cut from gameplay to a video scene there is a 2 or 3 second pause while it buffers the video.  On a more thought out game the buffering would happen when the player gets close to that part of the level so that when it was time to play the video there would be an instant switch into the video with no delay.  Space Channel 5 Part 2 did this in several spots like when you come out of the space station in level 4 at the end there is a seamless cut from real time 3D to video.

  • Networking

    Many current games have a network component which is yet another entire job

    • basic communication

      someone has to design and program the low-level networking system

    • reliable communication

      someone also has to design and deal with the high level data that the game needs to communicate.  Keeping things in sync, not crashing if the server goes down or one of the clients, etc.

    • client setup

      the client (your home machine) has to deal with all the different ways it might need to connect.  Through modem, through DSL, PPPoE, directly, behind NAT, through a proxy, etc.

    • server setup

      some games like Everquest or Final Fantasy XI require a server which could easily be yet another entire team team of programmers

  • Tools

    Lots of teams have over looked tools and how much work there is here as well.  Some large companies have entire tools departments although that's often only a starting point.  Someone technical still has to interface and tweak the tools to match a specific game.<ul>

  • 3D Export Tools (from Maya or 3D Studio Max)

    Most companies use either Maya, 3D Studio Max or Softimage to make 3D graphics but then some programmer has to create either an exporter or some tool that will take the data from those tools and turn it into something useful in the game.  Those tools have to support all of those effects listed in the graphics section including skinned characters, morph targets, instances, vertex colors, normal maps and more.  A good tool set would also allow the exporting of entire scenes for real time cutscenes.

  • 2D Export Tools (from Photoshop or TGA or PNG)

    Some how you've got to get those graphics from Photoshop, your digital camera or Painter into the game and into a format your target hardware can use.  The might include things like compression for those systems that support it or palette based textures to save memory.

  • Data path creation

    Generally someone has to setup a bunch of tools that are run that take all the original data and make it ready to load into the game that includes:

    • 2D graphics

      getting all the textures and bitmaps in, making sure none of them are larger than can be handled and that they fit in memory

    • 3D graphics

      pulling all the polygons and other animation data in, connecting it to the textures

    • Level Data

      all your data for where things are in the world, paths for enemies to follow, triggers the start things going, etc.

    • Sounds

      Getting all those sounds into the game in a fast way, handling the fact the most likely all the sounds won't fit in some levels. Writing tools or scripts to convert all those sounds into bundles or put them on the CD in special formats or knowing where they will be on the CD so you can queue them up.

    • Music

      tools to convert to your structured formats and pull in all the samples to make the music.  Some teams have special tools for the musicians and sound guys so they can actually make and test the sounds on the target systems

    • Video

      getting all that video in your custom format and adding whatever extra data you need in their like subtitles or alternate soundtracks.

  • Event Editing

    Some games have an event editing system for designing puzzles and other events.  It's easiest for the designers if there is a tool that shows the relationships between objects, the events they are sending or listening for etc and makes it easy for the designers to edit those connections.

  • Interface Editor

    Some games have a 2D interface editor to help make it easier to make all the 2D glue screens.  A few games have used Flash for this.

  • Outdoor Map Editor

    If your game has a special way of making the levels you might need to program a custom outdoor level editor.  Warcraft comes to mind.

  • Level Compiler

    Most games need some kind of level compiler to do major processing on all the data to make BSP information or PSV information or arrange the data for spooling.

  • Indoor Map Editor

    If you are using a custom system you might also have an indoor editor like Worldcraft.

  • International Systems

    With 1/3 of your market in Japan, 1/3 in the USA and 1/3 in Europe it would be best if you considered internationalization upfront.  It could be as simple as putting all your text in Excel with macros to get it all out and put it in the game.  Excel supports all languages but you need to do all this upfront and someone needs to write those macros and any other tools or systems that take that data and get it read for the game.

  • Hopefully you've gotten some idea that there is actually lots of programming to do on a video game.  This is one reason why it can be a great idea to buy an engine and have some percent of this already done for you.  Sadly, at least on consoles, none of the engines are setup to give you a shipping game without lots of work on your part first.

    Art

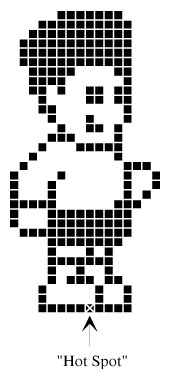
    Art creation for games has totally changed over the years as well.  When I started in games in the late 70s, early 80s there was no Photoshop or Maya.  To get graphics into a game we would sketch the graphics on graph paper and then write down all the positions of the pixels on the paper and type that information into the computer by hand.  Now we have tools like Photoshop for 2D graphics, Premiere, After Effects and Vegas for video production, Maya and 3D Studio Max for 3D graphics, digital cameras, scanners, etc.

    At the same time, Pac−Man was 16x16 pixels and would take only a few minutes to make today but today's games have levels consisting of thousands to millions of polygons.  A 3D character is 2000 to 20000 polygons and has a bone system from 15 to 80 bones.  Each vert ex on the character has 1 to 4 hand set weights for how much each bone influences it and the bones often have to have constraint systems or functions applied to them so they don't bend the wrong way.  Textures have to be drawn to cover a character, often separate textures for different parts.  And, as opposed to just a couple of years ago when we only had to make a color texture, we now have to make bump map textures, reflection map textures, glow textures, and a host of others.

    Making a character like Pac−Man took just a few minutes including animation.  Making a character like Solid Snake takes months.  A few days to make the model, then all the textures, setting up the bones, connecting and weighting all the vertices and then animating. Pac−Man just opened and closed his mouth.  Maybe 4 frames total.  Today's characters have thousands of frames of animation and even though the computer tweens for us we demand so many moves that it takes months to make them all.

    And that's just the in game characters.  We need artists for the levels.  Artists for all the glue, the title, our logo, the score bar or hud, particle effects.  We have video scenes in most games today that often require a whole separate art team.

    Another issue is that for some systems the artists need to create LODs (Level Of Detail) models.  In other words they might create a character out of 3000 polygons for looking at when she's up close to the camera and another out of 300 polygons when she's far away and only 1 inch high on your screen.  This saves processing time and allows the game to run smoothly but requires the artists to make more models and textures.  There also MIPs which are textures that are smaller in resolution used when an object is being drawn far from the camera.  Without them things would be slow and also flicker a lot.  Often they are generated automatically but sometimes they need to be hand edited if the auto−generation doesn't do a good job or if you want special effects.

    On top of that, many systems require the artists or designers to make separate models for collisions for the entire level.  These models are similar to the 3D models used in the level but are much simpler with no details and no textures.  Still, it's lots of work and often they have to be tagged with all kinds of attributes like "this thing is deadly" or "this thing is sticky".  And it's not just collision geometry marking what's solid.  Trigger boxes need to be added that mark things like when the player steps inside this area have the boss appear or start a dialog or cutscene or blowup something.  Others might be there only to help direct the camera.

    And then, often the AI in the system requires lots of data that we ask the artists to put in.  In the simplest case it's just to put an object in the 3D program to mark where a game object will start but it can go up from there from having to draw the paths the objects will follow or having to add special AI geometry that marks where an AI character can walk, where he can't, where he should jump or step down, etc.

    Just like programming art has started to get specialized.  In the past a couple of artists did it all.  Now we have specialty artists.  Storyboard artists, 3D modeling artists, texture artists, lighting artists, animators, 2d artists.  I'm sure like the movies we may even have camera artists soon.

    With all that art some companies have even gotten to the point that they have special software to try to keep track of it all.

    And it's only going to get worse with the next generation.  Today to make a belt buckle on a character an artist just draws it into the texture by hand.  On the next generation games, for example Doom 3, the artist actually models the belt buckle in 3D, textures it with a metal like texture and then tools take over and extract a color texture and a normal map so that in the game it still looks like a 3D belt buckle complete with highlights, reflections and shadows.

    Another thing is you are not going to be able to just hire any old art student or buddy that draws cool pictures of anime characters.  Making good art for games is not the same as making good paper art or even movie CG art.  We've got serious limits.  In a CG movie some artist might use procedural hair and skin for a character and might use a 1024x1024 texture just for the character's eyeball.  They might use nurbs or subdivision surfaces, something the current consoles are not really up to.  They might have a million polygons in their model and all 202 human bones were as a game might have 3000 polygons and 15−30 bones and a limit of 1 256x256 texture for an entire character.

    Finding artists that can make good stuff with those limits is very difficult.  As an example of some artists that can, the Gran Turismo 3 artists and the Metal Gear Solid 2 and 3 artists.  All of those games have relatively low−tech graphics engines but the artists are so good those games look incredible.

    Sound and Music

    In the past sound and music in games were pretty much a last minute thing.  Once the game got 1 or 2 months from shipping the company would hire a sound or music person or both to quickly fill the game with beeps, buzzes and background music.  As games get bigger and bigger this is no longer the case.  Now, many games have almost full orchestral scores and thousands of sounds and we still have extremely limited memory so getting all those sounds and music to fit requires more than just musical skill.

    To give you an example my friend on the Jak II team said for one language they had 4000 files of dialog!  They did 9 languages so that's 36,000 files!!!!  Someone has to go through all 36,000 and make sure they are all correct, all finished, all in place.  And that is just the dialog.  They still had music and sound effects.

    And, speaking of memory, there is never enough room so you'll need programmers to make up systems to get you all those sounds.  In Gex, Gex has like 400 quips or more.  I don't remember how long the actual list was but we only had memory for 1 quip at a time and so I had to write a system that would try to load a relevant quip, while we were spooling music off the CD at the same time.  You can not play the sound until it's loaded and a relevant quip is one that Gex would say when he attacks a particular enemy or sees one or gets hit by one.  In other words, you can't wait until Gex does his move and then load the sound and play it.  It might be 1 or 2 seconds before that sound is read to play.

    Another example.  In Crash Team Racing there were tons of quips as well.  Those quips were played directly off the CD as CD−XA audio so the sound programmer had to make a system to put all those sounds on the CD and queue them up so they could be played quickly when they were needed.

    For a while in the mid 90s musicians thought Redbook audio, playing music directly off the CD, was going to be the end all be all for game music.  They could use all the tools at their disposal to make the highest production value music ever.  The industry quickly figured out that red−book or streamed music only fits a very small, very limited set of games.  For one that's because that kind of music takes time to switch and time to queue up so it's not easy to change the music instantly during game play in response to a power up or to the mood going from safe to dangerous.  For another many of today's games need to spool data off the disc while the game is playing.  That's impossible if you are using Redbook audio and can be problematic if you are using streamed music.

    So, most games use a some kind of structured music format.  The problem or issue is that just like it's hard to find a good artist that can make good art for your game within the limits of the game system, it's just as hard to find a good musician that can make good music within the limits of your music system.  They might get only 512K or 1Meg in which they have to fit all the instruments for the music that will be played during the current stage AND all the sound effects used in that level.  Try taking a look at the average size of a music sample or instrument and you'll see 512K is not very much memory.

    Video

    I'm sure you've noticed but today's video games often have video that rivals movies.  The stories may mostly suck but the CG quality is up there and that kind of CG does not come for free.  The opening movies you see can take teams of 5 to 10 people 3 or more months.  One small movie like that could take $100K to $200K or more.  And then you get into games like the Final Fantasy series which has tons of CG movies.

    Some people think they will get away cheaper by using real time CG cutscenes.  If they are kept extremely simple that might be true but if they are detailed like MSG 2 or Jak &Daxter they are hardly less work at all.  In fact they might even be more since with fully pre−rendered cutscenes there are no programmers needed to make tools and engines to play them back.  And, it's only going to get worse as the power of each new generation of hardware makes it possible to make real time scenes look like movie CG.  But, movie CG requires huge teams.  You don't get all those details until someone makes them

    And all the rest

    What else can I add in here.  Well, there's a month or 2 of bug testing.  If you are doing an international game you will have people testing in all languages from all over the world and you will need to give them each a version.  Many of you probably have DVD burners so you are probably aware that making a DVD takes time as just transferring 5 gigs of data over your network to the machines with the burners.

    Having versions for playtesting as well.  Playtesting is testing to see if the game is playable.  Maybe you test it and find that no one can figure out how to open that door or that the green key is under the 3rd box on the left and so you have to go back and redesign your game so that people don't get stuck and frustrated.

    There's also often a huge hit to your schedule for things like a version to take to E3 or other industry trade shows.  You might need to make versions for the press so they can have their reviews appear the same time your game hits the store shelves.

    Now−a−days you might also have to deal with pre−piracy, having the press for example, leak your game to the internet.  Having all that work you see above taken for free by some thieves and so you have to spend more work trying to prevent them.

    I'm sure I've forgotten quite a few things but hopefully this gives you some idea of why games take lots of people, years to make, and millions of dollars.

    Comments

    Programming M.C. Kids

    2003-06-12

    This article was written by myself and Dan Chang back in 1992 for the Journal of Computer Game Design sometime after we finished making M.C. Kids for the NES.  Some of it may be still be useful, especially if you are just learning programming and want to do a side scrolling game.

    Some of the issues solved here are less relevant today.  An NES used a 1mhz 6502 processor with only 2k of ram by default.  M.C. Kids used a kind of cartridge that added 8k of ram giving us a total of 10k.  Dealing with a 1mhz processor and only 10k of ram is not something most game programmers of today need to deal with.  Today we have GeForce4 cards or a PS2 and it's vector processing units.  We have 32 to 64meg of ram and we have DVD drives for storage.  Still, I'm sure some of the concepts here still have some relevance.


    © 1992 Echidna

    Gregg Iz-Tavares and Dan Chang


    M.C. Kids (That's Em Cee Kids)

    In this article, we take an in−depth look at programming a Nintendo Entertainment System (NES) "platform game".

    The Development Team

    Four people, Darren Bartlett, Gregg Iz−Tavares, Dan Chang, and Charles Deenen, created M.C. Kids in about eight months. Darren designed all the levels, laid−out all the maps and drew nearly all the artwork. Gregg and Dan programmed the game and all the tools needed to implement the game. Charles composed the music, created the sound effects, and programmed the music driver. By today's standards, this is a rather small team; look at the credits for some other platform games, and you'll see perhaps six artists, five level designers, one musician, one sound effects person, and five programmers!

    NES Capabilities

    Here is a summary of a Nintendo's features:

    You may expand the RAM by including it in your cartridge. You may add 8K of RAM to the program (direct CPU addressable) side, which allows you to keep track of more game information. You may also add 8K of RAM to the video side, which allows you to have four display screens instead of the normal two, and also allows you to re−define your characters and sprites. Without 8K of RAM on the video side your graphic images (character font and sprites images) must be hard−coded into ROM.

    Most video game systems use a character set and sprite system for displaying graphics. Unlike most home computers today that use a bitmapped display for graphics, the game systems have just a character mode. This character mode is very similar to the text mode on an EGA or VGA card. On a VGA card you can install your own font into the card's RAM through software (this is how the Norton Utilities 6.0 gets its spiffy look). On the NES you MUST install your own font because it doesn't have one built in. If you redefined all or most of the font characters to be pictures then you could make graphic games in text mode. Almost all video game systems work this way, including most systems at the arcade. What makes the video game systems look so good is that unlike VGA text mode in which each character can only have 2 of 16 colors, an NES character can have 4 of about 51 colors. Other systems like the SNES (Super NES) can have characters with up to 256 of 32768 colors.

    The advantage of a character−based game is that the entire screen takes far less memory to manipulate. An NES screen is 32 characters across by 30 characters down, and requires only 960 bytes to represent. This is much less memory to deal with than say an MCGA screen (64000 bytes), a Mac Plus screen (about 22000 bytes), or even a CGA screen (16000 bytes).

    Most video game systems also have what we call sprites. A sprite is a shape you can define and display in front of the text/graphics screen. Sprites are very much like those plastic colorforms found at toy stores. You can place them anywhere and they do not affect the picture behind them. On the NES you can display 64 8x8 pixel sprites, each with 3 colors. If more than 8 are displayed on the same horizontal scan line then the higher number sprites will not be display on that line. You must design around this. If you've played Super Mario 2 or 3 and you see Mario and 4 monsters there are around 24 sprites on the screen. If all the monsters are on the same horizontal strip you will notice the sprites flicker. This flickering was programmed because if it wasn't then one of the monsters or Mario would disappear.

    On the NES, you can create 4 screens and 4 sprite palettes, each of which are 3 colors plus one global background color. Sprites and screen characters can choose which of their 4 palettes to be displayed in. This allows you to display 25 colors on the screen without resorting to any tricks.

    The 6502 can only address 64K of memory so the ROMs are bank switched. You can purchase different bank switching schemes for your cartridge like 16K banks or 8K banks for the program ROM and 4K to 1K banks on the graphics ROM.

    You can also purchase a battery in your cartridge with the 8K of program RAM so it will be persistent (i.e., you can save your game) and you can purchase a timer interrupt if your product needs it for sound or special video tricks. Each of these cartridge extras raises the production price of your cartridge by a couple of dollars. If you plan to sell a hundred thousand or more cartridges, a couple of extra dollars per cartridge can really add up to lots of lost profit so usually you need to design your game to keep the cost as low as possible.

    Platform Games

    What is a platform game? It's a game in which you control an on−screen character who walks on platforms. Another common term for these types of games is "a ledges and ladders game" since most of them have ledges (platforms) to stand on and ladders to climb up or down between platforms.

    Platform games have been around for a long time. The first I know of was an arcade game called Space Panic by Gremlin which was quickly copied to the Apple II to become Apple Panic and Lode Runner. Other early platform games are Donkey Kong, Kangaroo, Mappy and Mario-Bros. In the early 80's a game called Pac-Land hit the arcades. It was the first platform game in which one of the goals was to collect lots of items and also the first platform game to scroll. It was not a big hit but it's ideas were soon adopted into most platform games.

    The next big improvement came with Super Mario Bros. Up until that time most platform games had only one goal − stay alive as long as possible. The games had few levels, but a player could, if skilled enough, play the game forever. Super Mario Bros was one of the first platform games to add an adventure element and an ending. In Super Mario Bros the object is to save the princess, and to do it the player has to play through a large number of levels. Super Mario Bros had about 32 levels. Once the player finishes all 32 levels the game is over; you've "rescued the princess".

    Today's platform games have added quite a few new twists to the older designs. The Mario series is considered the standard against which all other platform games are compared. Mario 2 had 23 levels and added your choice of four characters, each with different abilities. It also added vastly better graphics and about twice the object types as Mario 1. Mario 3 had 88 level s, and instead of different characters, you had different suits, each suit giving the player new abilities. Mario 4, with its 64 levels, added quite a few more object types.This Mario was designed to be completed: you rarely run out of lives, and you can save your progress every step of the way.

    M.C. Kids

    In M.C. Kids the Hamburglar has stolen Ronald's magic bag and you, as Mick or Mack, must find the magic bag before Hamburglar does something we'll all regret. You start out at Ronald's Clubhouse and must find at least four of Ronald's magic cards before he can send you on to Birdie's Treehouse.

    The game starts with a brief intro and then shows one of the M.C. Kids on a top−down map showing 6 levels and the clubhouse. The player can guide the kid down the connecting paths to the various levels. Upon entering a level the view changes to the traditional side view for a platform game. The player now proceeds through the level attempting to find at least one magic card and then finding the exit from the level.

    The player continues going in and out of levels attempting to find magic cards. Once enough magic cards have been collected the player visits the host of the current land who sends the player on to the next land.

    Throughout each level the player encounters various objects that may help or hinder him on his way. Springboards spring him high into the sky. Moving Platforms carry him to hidden destinations. Creatures of various sorts bite him. PickupBlocks can be carried and thrown at the creatures to knock them off the platforms.

    M.C.Kids has about 43 playable levels with over 28 different creatures, 16 types of objects to manipulate and 27 distinct types of platforms, each with many variations.

    Game Levels

    Levels can be any size up to about 20 NES screens. The largest level requires 5120 bytes in RAM; each byte represents one 16x16 pixel tile (four 8x8 pixel characters). If we had chosen 8x8 pixel tiles, the same maps would have required four times the memory or 20480 bytes. The levels are stored compressed in ROM, in about one−third the uncompressed size. Without compression, we couldn't have even fit half of the levels.

    By unpacking the levels into RAM, we gained the ability to change the level during play. For example, the player can pick things up like Arches, Blocks, 1Ups, Cards and so forth that start off as part of the level. We attempted to reduce the cartridge cost by designing the game without the optional 8K program RAM. Each 16x16 tile would have a flag represented by one bit in RAM; the entire map's flags would take 640 bytes to represent. Each bit would represent whether the tile should be displayed as itself or as its alternate (see description of the seventh tileset byte, below). However, we deemed this solution sub−optimal, and we lobbied successfully for the extra 8K of program RAM. Without the extra RAM, we would have most likely have been forced to redesign the game either so levels didn't have to be modifed or so that it only scrolled in one direction. Super Mario Bros 1 has no RAM, and their solution was to only scroll in one direction. By scrolling in only one direction, the program does not need to remember items collected or affected by the player, because once an item has scrolled off the screen, it will never be seen again.

    Tilesets

    Each tile type has associated with it seven attribute bytes. The first four bytes define which characters to put in screen memory for each corner of the tile. The fifth byte defines which colorset the tile uses (0..255). The sixth byte specifies which type of tile it is (0..255). Some of the type values are: 0 = Sky, 1= Solid, 2 = Sloped left, $30 = Arch, $31 = Card, $17 = Falling Bridge. The seventh byte defines what the tile may change to if necessary. (E.g., collecting an Arch changes it to a blank sky tile, digging a piece of sand tile changes it to a dino bone tile.)

    Each tile also has 5 collision routines (see Collisions below), 2 contour tables and various flags including:

    Each Tileset may contain up to 64 characters and at most 64 tiles. A tileset can use no more than 4 colorsets (since the NES can only display 4 character palettes).

    Each level in the game may consist of up to four different tilesets. Every level uses the GLOBALS tileset that contains global items like the ending line, golden arches, pickup blocks, etc. Other tilesets include GRASS, FOREST,and LAVA where the GRASS tileset has lots of green tiles, the FOREST tileset has tiles for trees and leaves and the LAVA tileset has lava and rocks and burning bridge tiles. There are about 44 tilesets in M.C. Kids to choose from.

    In the above example the tile at position 0,0 in the map is retrieved. It is tile 4. Looking into the tables we pull out the four characters that make up tile 4 and place them in their proper positions to create a 1Up block (extra life). We also note that the tile uses colorset 1 and is of type X.

    Shapes and Animation

    A shape is several 8x8 sprites grouped together. There are 364 shapes, and 213 "animations" using those shapes. The shape tables take almost 8K to represent and we used a fairly compact format for the majority of shapes. There are two formats. The first format only allows sprites to be placed in an 8x8 grid:

    Colorset (0-15),
    X Pixel offset (+/- 127)
    Y Pixel offset (+/- 127)
    Width in 8x8 sprites
    Height in 8x8 sprites
    (Width by Height sprite numbers (0-127))

    The second format allows the sprites to be placed anywhere relative to each other:

    Colorset
    REPEAT {
     X Pixel offset (+/- 127)
     Y Pixel offset (+/- 127)
     Sprite Number (0-127)
    }
    END Marker.

     The second format also has a special "change color set" code. If the X Pixel offset is $80 (−128), then the next byte is the new colorset for the rest of the sprites. This allows one shape to use many colorsets.

    I've also seen a more compact format, which is something like this:

    Colorset (0-15),
    X Pixel offset (+/- 127)
    Y Pixel offset (+/- 127)
    Width in 8x8 sprites
    Height in 8x8 sprites
    First Sprite Number (0-127)

    In this format, if the first sprite number is 17, the width is two, and the height is three, then the shape would use sprites 17, 18, 19, 20, 21 and 22.

    Shapes default to facing right. Flipping a shape faces it to the left. Most shape's "hot spots" are at the bottom center pixel:

    Placing the above shape on screen at position (0,0) would result in:

    An animation specifies the order and duration for a list of shapes:

    SPGopher1,4
    SPGopher2,4
    0

    The '0' marks the end of the animation at which point it repeats. When the animation starts to repeat, the system notifies the object routine, which can then modify its behavior. (see Objects below)

    The duration is represented by six bits, so the longest any given shape can remain displayed is 63 ticks (63/60 second). The other two bits specify flipping the shape in the X or Y direction. This flipping information is in addition to the object−controlled flipping of a shape.

    If I were to do it again, I would add positional information into the system so that an animation could move an object.

    Objects

    Our system allows for N objects to be active at any one time; for M.C. Kids, N is 16. This is a large number, as the program begins to bog down with more than about seven objects. We discovered this limit during development, and we re−tuned most of the levels so the player can't lead more than six monsters together. Still, to deal with some unforeseen situation, the program will handle 16 objects. If you have a third party NES controller with a turbo button, stand in front of a snow pile and press the button. You should be able to get 10 or more snowballs in the air at once. Games like Mario 2 and Mario 3 are carefully designed so that the program almost never introduces more than five objects at once.

    Objects are introduced into the object system through various means. The most common are objects that appear as the player moves through the level. For each level in the game there is an object introduction table. This table describes where various objects appear in the level such as gophers, fish, crabs and moving platforms.

    Each entry in the table has 3 data fields: X position, Y position and object type. The object table is sorted in ascending X position order. The object introduction routines keep an index for the current position in the table.

    When the player moves to the right, the current screen position is compared with the current object in the table. If the object is inside the screen it is introduced to the active list of objects and the index is incremented. If the object is not inside the screen then all objects further along in the table are also not inside the screen since they are farther to the right.

    The routines also handle object introduction when scrolling left, up and down in a similar manner. For moving up and down there is a table of indices sorted in ascending Y position.

    There is also an active flag table in RAM with one flag for each entry in the object introduction table. When an object is introduced from the object introduction table its corresponding active flag is set. When the object introduction routines are about to introduce a new object they first check its active flag to see if the object has already been introduced and if it is they don't introduce the object again.

    Objects may be added for other reasons. For example, when the kid steps on a SpringBlock tile, a SpringBlock object is added to animate the SpringBlock. When the kid picks up a 1Up, a 1Up object is added which spirals and flashes a 1Up shape. When the boat hits water a splash object is added. When a leaf generator object is present it adds falling leaf objects at regular intervals.

    For every object there are flags (bits) for the following:

    For each object in the list the main object loop will do the following things.

    1. Call the specific object's routine (e.g., call MCKidDoit for the Kid, call GopherDoit for the Gopher, and call CrabDoit for the Hermit Crabs).

      These routines do object specific things. (E.g., the beaver routine looks for the Kid, and if he is below the kid, he will stand and look back and forth; if he is above the kid, he will run toward the kid. A platform routine follows its track, The kid's routine reads the joystick and acts accordingly. )
       
    2. If the object has X Physics turned on, then the X Physics are computed using Acceleration, Velocity and Position. Object positions in the game are 16 bits significant and have a resolution of 1/4 pixel. This is our 'decimal place' and allows the objects to move smoothly at various speeds. This provides that Mario "feel". Some games force all monsters and the player to move at some integer multiple of pixels per vblank, and thus lose some of that fluid "feel".

      There are two types of X movement routines. One routine is used when the object is in the air, and the other is used when the object is on the ground. The routine for movement in the air just uses normal physics. For movement on the ground, we need to make the object follow the contour of the ground, so for each pixel moved left or right, the Y position is adjusted to the correct height.
       
    3. Object to Object collisions are determined. The current object is compared with all other objects it needs to be compared to, and if there is a collision, the object's collision routine is called. (E.g., for a Gopher, the routine GopherClid is called. GopherClid turns the Gopher around. For the Fill-In-Block, it checks to see if the object collided with the Kid; and if so, it sets the correct variables to allow the kid to pick it up [if the Kid chooses to do so]). It also checks if it collided with a monster, in which case the monster gets hurt.

      Every object can only collide with one other object per frame, so every object is assigned a collision priority so that it will collide with the most important object. It is more important to know that the kid hit a monster than to know that the kid hit a PickupBlock.

      All objects have a collision matrix, so that they can only collide with certain other objects. The kid collides with everything. A PickupBlock only collides with the kid and monsters. Some monsters collide with the kid, other monsters, and various project tiles. Certain other monsters don't collide with other monsters. Not having to check every possible collision saves tons of time.
       
    4.  If the object has horizontal tile collisions turned on, then left or right tile collisions are checked depending on whether the object it moving left or right.

      To do the collision, either the left most or right most pixel of the current object is sent to the left or right tile collision routines. The tile type of the tile in the map t hat contains this pixel is looked up. A tile routine exists for each particular tile type; it decides whether a collision has taken place (or what other action should be taken, like collecting an Arch or crossing the ending line). If a collision occurs, then the specific directional collision routine for the particular object is called. (E.g., if we're a gopher and we collided left, then GopherLeft is called which makes the gopher turn around and go right; if we were going right then GopherRight is called, which makes the gopher turn around and go left.)
       
    5. If the object has Y physics turned on then Y physics are computed.
       
    6. If the object has vertical tile collisions turned on then Y tile collisions are done, similar to the X tile collisions, but only if the object is in the air. If the object is on the ground, then 'Ground' Collisions are done.

    This means that every tile type can have up to five routines (TileLeft, TileRight, TileUp, TileDown, TileGround). Most tiles point to the same routines, either SolidLeft, SolidRight, SolidUp, SolidDown, and SolidGround, or SkyLeft, SkyRight, SkyUp, SkyDown, and SkyGround. Every tile also has two contour tables, each 16 bytes in size, one for walking to the left, the other for walking to the right. The tables tell the routines how to adjust the Y position for each pixel moved in the X direction.

    Every object has eight routines: ObjectInit, ObjectDoit, ObjectClid, ObjectLeft, ObjectRight, ObjectUp, ObjectDown, and ObjectGround.

    If I were to do this again I might get rid of many of the flags and just have each object call the routines it needs. Thus, instead of there being an X physics flag, I would just have any object that needs X physics call a routine to compute it.

    Collisions

    Now for the fun part. NOT! First, here are all the kid's points that are checked for collisions against the tiles:

    Point H is the Hot Spot and is considered the position of the kid. This spot will usually be inside the top of a tile:

    This means the kid is standing in/on a normal solid tile. If he had been one pixel higher, he'd be 'in' a sky tile.

    Points 1 and 2 are used for checking when the kid should fall off a vertical ledge. If both points are not on something then the kid should fall.

    Point A, B, C and D are used for checking left and right tile collisions. Only A and B or C and D are checked depending on the direction the kid is traveling. Points B and D are checked for every type of object, but points A and C are only checked for the kid.

    Point T is used for checking collisions when the kid is going up, like when he bonks his head into a platform.

    Most of these points are adjustable in some way. Points 1, A and B always have the same relative height but can be moved left or right together. The same is true for points 2, C and D. Point T can be moved up. Points H, 1 and 2 can be moved down together.

    Terrain

    One of the hardest things to program is the object−terrain interaction. Here is an example slope:

    For easy reference, the tiles are numbered 0 through 9, as well as being assigned a letter representing its type, where N = Normal Tile, H = Hill Tile and S = Sky Tile.

    I use offset tables for each tile that states for each horizontal pixel, how to get to the next pixel, left or right in the Y direction. Thus, if you are on pixel eight on a left rising hill slope, and you move left to pixel seven, the table might say move up one pixel. This may not be the best way, because it means that all movements are relative instead of absolute, so if there is an error somewhere it could get exaggerated. By using a table, we can have irregular shaped slopes.

    Some of the problems we encountered in implementing the terrain logic:

    1. When walking left on tile 9 the kid will eventually move into tile 8 (where he doesn't belong). To solve this I have to 'look-up' one tile to see if the kid should start walking up a hill. One possible solution is to make another tile type B for 'Beginning of hill' and placed it at tile 9. Then, when the kid walks into a type B tile we would know what to do. This could be a problem for the artist, though, because if he or she put a type N where there should be a type B, the kid would walk into hills.
       
    2. When walking left on tile 3 the kid will eventually walk into tile 0 (the sky). This bug remains in M.C. Kids (check it out). It could be fixed similarly to problem 1 by making a new tile type E for 'End of Hill' that would be placed at tile 0. Then when the kid walks into a type E tile, we would know what to do.
       
    3. Often there are type N tiles up in the sky as platforms. Usually the kid is allowed to walk right until the kid's point 1 is 'off the tile', and then the kid will fall. This is the way we want it. However, what if the next tile is a Hill tile (type H)? When the kid walks down the hill, the kid's hot spot (point H) should always be on the 'slope'. However, since we don't allow the kid to fall until his point 1 is off the edge of tile 2, he won't walk down the slope. To solve this problem we created a new tile type, type A, for Adjacent to hill, to place at tile 2. This tile type is placed next to Hill tiles, and causes the kid to fall when point H leaves the tile, instead of when point 1 leaves the tile.

      Mario 3 solves this problem differently. It uses type N tiles for platforms and other solid tiles. They act like our type N tiles, in that the kid won't fall until his point 1 is off the tile. However, if the level contains slopes, than all type N tiles change their behavior to something similar to our type A tiles. Thus, in Mario 3, you cannot jump up and down with only your point 1 on the tile in any level that has slopes.

    Many of the reasons for these contortions have to do with speed. Most video game systems must run at 60 frames a second, and if you have to look up 4 or 5 tile positions per collision pixel per frame you are going to run out of time. All this is something you should consider when designing a platform game. It is much easier the create a platform game with no slopes, so if you are short on time, then design your game so that it doesn't need slopes.

    Altogether, we have around 100 tile types, such as Solid, Left Slope, Right Slope, JumpThru, Death, Spring Board, Slippery Solid, Slippery Left Slope, Slippery Right Slope, Go behind Left Slope, Go behind Solid, Ending Line, Falling Bridge, and Guide Tiles (for moving platforms).

    For each tile type, we also have information like: Maximum speed (slower going up hill), Extra Acceleration (used for speeding down hill and or slowing up hill), Friction (used for slipperiness), and Turn around speed (how quickly the kid can reverse direction). If we wanted to do Sonic the Hedgehog, we could have also added animation information (for what direction Sonic should be facing), and slope angle information (so that when the player presses jump, he jumps at some angle relative to the slope).

    If I were to do this again, I would probably add additional tile types for the above problems. I might also change the offset tables to be absolute instead of relative depending on the target processor. Parallel tables were used extensively for most of the data in the game mostly because a 6502 can more easily deal with parallel data than it can with records or structures. With other processors, like the 68000, it would be far more efficient to use structures or records.

    M.C. Kids Data Statistics

    Here's a look at how many items we had in each category, how many bytes the items required in compressed form, how many bytes the items expanded to, and how much was saved by compressing the data:


    Packed

    Unpacked

    Savings

    Levels

    56+

    58876

    177944

    67%

    World Maps

    20

    2947

    4856

    39%

    Houses

    7

    878

    1867

    53%

    Text Msgs

    64+

    4211

    7836

    47%

    Pictures

    9

    1683

    3590

    54%

    Tilesets

    29+

    5691

    7801

    27%

    SpriteFonts

    17


    34816


    TextFonts

    3


    3072


    CardFonts

    4


    4096


    TilesetsFonts

    44


    45056


    PictureFonts

    9-10


    16384


    ShapeTables

    577


    8098


    Object+Tile Tables


    5854


    Music+Driver


    12372


    Monster Routines


    13030


    Kid Routines


    4089


    Kid Map Routines


    688


    Tile Routines


    1000+


    Missing: scrolling, animation, sprite, vblank, setup, game flow, unpacking and other routines.

    Shameless Plug

    Well, there you have it. Obviously, if you need a platform game, you should come to us. Our engine can handle nearly any kind of platform game currently designed, and we can tailor it quickly. Of course, now that you've read this article, you know how to do it too!

    Comments

    TGA Thumbnails for Windows

    2003-02-02

    If you are looking for a solution for TGA on Vista and Windows7 both 32 and 64 bit check out FastPictureViewer WIC RAW Codec Pack.

    Can you figure out what's different about this picture?

    Look close.....The difference is you are seeing thumbnails for TGA files inside Windows Explorer!!!  That also means you can see them inside pretty much any file open / file save dialog.  Hooray!

    Windows 2000 and XP provide thumbnails for .JPG, .GIF, .BMP, .AVI, .MPG and a few other formats.  What's cool though is Windows 2000 and XP also provide an API for adding support for more formats.  So, I found an example, whipped out some old TGA code and threw this together.

    Not too many *normal* people use the TGA format but in the video and computer game industry it's pretty popular.  Probably because it's supported by most graphics software and because it's very simple to use.  You can read or write a basic TGA file in just a few lines of code.

    Just in case you are not aware, the same function is available inside the normal Windows standard file open/save window so for example if you are in Maya selecting a texture file you can select by clicking on a thumbnail instead of having to remember the name of the file.

    To do this, in the file open/save window you click the last icon on the right and pick "thumbnails" (1)

    Also, just incase you didn't notice you can resize the standard file open/save window (2) so that you can see more files at once.

    Download:

    You can download the installer by clicking the link below.

    thumbplug_tga1.10.exe(268k)
    [ for TGA (Targa) files ]

    There is also a version for Softimage PIC files.

    thumbplug_pic1.11.exe(309k)
    [ for PIC (Softimage) files ]

    And for Maya IFF files.

    thumbplug_iff1.09.exe(314k)
    [ for IFF (Maya) files ]

    THERE IS NO WARRANTY HERE.  USE THIS AT YOUR OWN RISK!  THERE IS ALSO NO SUPPORT!

    Notes:

    The TGA(Targa) format supports many formats but most of them are pretty rare.  For example, TGA files can have their images stored in any direction, right to left, bottom to top, top to bottom, left to right.  They can also support 15 and 16 bit pixels.  But, in my personal experience, I've never seen a TGA file stored any way other than bottom to top

    The PIC format also supports many formats.  This plugin currently only supports 24bit and 32bit files.

    Version History:

    TGA
    v1.092003-02-02
    • first public release
    v1.102004-08-15
    • attempted to fix issues with vertically flipped files
    PIC
    v1.112003-02-02
    • first public release
    IFF
    v1.092003-02-02
    • first public release

    Source Code:

    The source is provided under a FreeBSD style license.  If you do find a bug or add a feature I'd be happy to hear about it for if you find it really useful it would be nice to hear.

    You can download the source code here

    thumbplug_tga_src1.10.zip(28k)
    [ for TGA (Targa) files ]

    thumbplug_pic_src1.11.zip(25k)
    [ for PIC (Softimage) files ]

    If you download the source be sure to read the readme.  It's important that you make a new CLSID or there will be conflicts.

    Comments

    Maya Mel/API tips, hints, and other random stuff

    2002-12-13

    I've been doing some Maya programming recently. Seeing as how I couldn't have done it without the help of various individuals that have put their hard earned knowledge on the web I thought I'd post some of what I've derived.

    Realize that the MDagPath::partialPathName() of "|foo|bar|moo" is NOT always "moo"!!!!

    There are two functions, MDagPath::fullPathName() and MDagPath::partialPathName(). All dagNodes in Maya can be referenced by a DagPath and you get an ASCII representation of them using these two functions.

    At first glance it appears it's like files and folders except they use vertical bar "|" to separate levels and so the first thing most people assume is that MDagPath::fullPathName() returns the full path and MDagPath::partialPathName() returns just the name. That is NOT true!!!! Read the docs closely, MDagPath::partialPathName() returns the shortest path which can still be distinguished from any other path.

    In Maya, like in files and folders, as long as things are in a not in the same part of the hierarchy they can have the same names. So, if you have two dagNodes one with a full path of "|group1|group2|mymesh" and another with "|group1|group3|mymesh", if you call MDagPath::partialPathName() on the first one you'll get "group2|mymesh".

    I've seen lots of code, including my own, that thought if I called MDagPath::partialPathName() I'd always get only everything after the last vertical bar.

    How do you extract the bind/pose state of a bone/joint hierarchy the correct way?

    First, what do I mean by correct way? When you are making a game and you have one skin characters, generally you need to store a polygon mesh and effect it by various bones. The general way to do this requires that you know the position and orientation of the bones when they are exerting no influence on the mesh. In other words, their positions and orientation at the time the mesh was connected or bound to the bones.

    There are 2 common ways to do this that I know of both of which are sub optimal

    1) Make your artists put the their object/character/monster in it's bind/pose position and then run some exporter that records the position and orientation of all the bones. The problem with this method is it requires work on some artist's part. Work that has to be repeated each time something is changed or each time you change the data format for your game or each time you start a new platform.

    Another problem with this method is if you are making a 3D movie scene exporter it requires your artists to export their objects separate from the movie since most likely at no time during the movie are your characters in their bind/pose state

    2) AliasWavefront suggests you do this by looking up the dagBindPose info and they give you a sample in their devkit called dagBindPose.cpp This fixes all of the above problems. It unfortunately has one new problem. It is possible to delete the bind/pose information from Maya. Maya will still function fine, your scene will still work but your exporter that tries to look up the dagBindPose will fail.

    You could tell your artists "DON'T DELETE THE BINDPOSE" but my experience is that most artists have a hard time following rules on top of which you never know when some other process or plugin or editing method will happen to always delete that info.

    So, here is what I currently do: Even if you delete the bindPose Maya still has the information stored because without it it too could not manipulate your characters. Here is how to look it up:

    Assuming jntFn is a MFnIkJoint:

    MObject jointNode = dagPathForJoint.node();
    MFnDependencyNode fnJoint(jointNode);
    MObject attrWorldMatrix = fnJoint.attribute("worldMatrix", &stat);
    
    MPlug plugWorldMatrixArray(jointNode,attrWorldMatrix);
    
    for (unsigned i = 0; i < plugWorldMatrixArray.numElements (); i++)
    {
        unsigned connLength = 0;
        MPlugArray connPlugs;
    
        MPlug elementPlug = plugWorldMatrixArray [i];
        unsigned logicalIndex = elementPlug.logicalIndex();
    
        MItDependencyGraph dgIt(elementPlug,
                                MFn::kInvalid,
                                MItDependencyGraph::kDownstream,
                                MItDependencyGraph::kDepthFirst,
                                MItDependencyGraph::kPlugLevel,
                                &stat);
        if (MS::kSuccess == stat)
        {
            dgIt.disablePruningOnFilter();
            int count = 0;
    
            for ( ; ! dgIt.isDone(); dgIt.next() )
            {
                MObject thisNode = dgIt.thisNode();
    
                if (thisNode.apiType() == MFn::kSkinClusterFilter)
                {
                    MFnSkinCluster skinFn(thisNode);
    
                    MPlug bindPreMatrixArrayPlug =
                         sknFn.findPlug("bindPreMatrix", &stat);
                    MPlug bindPreMatrixPlug =
                         bindPreMatrixArrayPlug.elementByLogicalIndex(logicalNdx,
                                                                      &stat);
                    MObject dataObject;
                    bindPreMatrixPlug.getValue( dataObject );
    
                    MFnMatrixData matDataFn ( dataObject );
    
                    MMatrix invMat = matDataFn.matrix();
                    glbMat = invMat.inverse();
    
                    // glbMat is now the world matrix for this
                    // particular joint at bind/pose time
                }
            }
        }
    }

    Of course you only get global matrix with this method. To get a local matrix you'll have to find the same information for the parent joint and multiply it's inverse with this matrix. If you want translation, scale and rotation you'll need to do some math. One relatively easy way is to use MQuaternion, init with the matrix. You can also convert that quaerntion to an MEulerRotation if you want.

    NOTE: It would probably be better to start with the mesh and see what things are influencing it rather then look at the joints directly. Unfortunately I was working with a system that was already in place and so that was not an option for me.

    How do you extract the skin for a one skinned model the correct way?

    Again, what do I mean buy correct way. Just like for the bind/pose of the joints/bones, to do a skinned character in a game you generally need to save off the mesh before it has been influenced by the bones.

    Again, many poorer tools force the artists to manually put the character in that state before exporting, then they read the visible mesh in that state and save it out.

    Even AliasWavefront again, does not give any correct examples about how to do this. They have one example that searches through the entire hierarchy for all MFn::kSkinClusterFilter nodes and then exports geometry by looking up things through MFn::kSkinClusterFilter::getInputGeometry(). First, looking up all SkinClusters is not a good example, especially if you want to write a scene exporter. Second, calling MFn::kSkinClusterFilter::getInputGeometry() will give you the mesh at the top of the input chain. That may or may not be the mesh that's is actually being deformed. What I mean by that is if your artists did not collapse their construction history before they bound their mesh to the bones then getInputGeometry() will return the mesh before all those edits. That, for example, might be a 50 polygon mesh but the actual mesh being deformed might actually have 100 polygons.

    The correct way is to lookup what data is actually coming into the skinCluster. That data is the data after it's come out of the original mesh, after it's been edited, and just before it's about to be deformed by the bones.

    MStatus stat;
    MFnDagNode dagNode(meshDagPath);    // path to the visible mesh
    MFnMesh meshFn(dagPath, &stat);     // this is the visible mesh
    MObject inObj;
    MObject dataObj1;
    
    // the deformed mesh comes into the visible mesh
    // through its "inmesh" plug
    MPlug inMeshPlug = dagNode.findPlug("inMesh", &stat);
    
    if (stat == MS::kSuccess && inMeshPlug.isConnected())
    {
        // walk the tree of stuff upstream from this plug
        MItDependencyGraph dgIt(inMeshPlug,
                                MFn::kInvalid,
                                MItDependencyGraph::kUpstream,
                                MItDependencyGraph::kDepthFirst,
                                MItDependencyGraph::kPlugLevel,
                                &stat);
    
        if (MS::kSuccess == stat)
        {
            dgIt.disablePruningOnFilter();
            int count = 0;
    
            for ( ; ! dgIt.isDone(); dgIt.next() )
            {
                MObject thisNode = dgIt.thisNode();
    
                // go until we find a skinCluster
    
                if (thisNode.apiType() == MFn::kSkinClusterFilter)
                {
                    MFnSkinCluster skinCluster(thisNode);
    
                    // get the mesh coming into the skinCluster.  This
                    // is the mesh before being deformed but after
                    // being edited/tweaked/etc.
    
                    MPlug inputPlug = skinCluster.findPlug("input", &stat);
                    if (stat == MS::kSuccess)
                    {
                        MPlug childPlug = inputPlug.elementByLogicalIndex(0);
                        MPlug geomPlug = childPlug.child(0);
    
                        geomPlug.getValue(dataObj1);
    
                        // let use this mesh instead of the visible one
                        meshFn.setObject(dataObj1);
                    }
    
    ...

    use the various MFnMesh functions to pull out the verts for this mesh.

    How do you keep network plugins updatable (unlocked)?

    The issue is that often at a game company you write some plugins, you put them on the net and you have each artist add the network path to their Maya plugin path. That way they all have access to the plugins. The problem is, as long as they are running Maya those plugins are locked (write−protected) so you can't update them unless you ask all your artists to quit Maya.

    The simple answer is "don't let them be run off the network".

    There are several ways to do that. At one company I set up a batch file with an icon on the artist's desktop. "Update Maya Plugins". This batch file would go get the plugins off the net and copy them to the artist's machine. That way the artist is never actually using the files on the net therefore they are never locked and can always be updated.

    At my current job we made it more automated. Using the following script either in the user's userSetup.mel or in a script called by userSetup.mel, each time they run Maya it copies the plugins off the net to their local drive. There is no noticeable delay for us.

    −−−−−Maya.env−−−−−

    # Plugin Path
    MAYA_PLUG_IN_PATH = $MAYA_LOCATION\our-plugins
    
    # Mel Script Path
    MAYA_SCRIPT_PATH = \\network\maya\4.5\scripts<

    −−−−−−−OurStartup.mel−−−−−−−

    //
    // get path to user's LOCAL script folder
    //
    string $ourMayaVersion     = "4.5";
    string $wowMayaPluginPath  = "//network/maya/" + $ourMayaVersion + "/plug-ins/";
    
    //
    // there's no way to add the user's local maya folder so let's use
    // the main maya folder
    //
    string $myPluginDir = `getenv "MAYA_LOCATION"` + "/our-plugins";
    
    //
    // check if there is a plugin folder inside
    //
    if (!( `filetest  -d $myPluginDir` ))
    {
        // no, so make one
        sysFile -makeDir $myPluginDir;
    }
    
    // get a list of all our plugins
    string $files[] = `getFileList -folder $ourMayaPluginPath -filespec "*.mll"`;
    
    // copy all the plugins locallly
    for ($file in $files)
    {
        print("copying " + $file + "\
    ");
    
        string $src = $ourMayaPluginPath + $file;
        string $dst = $myPluginDir + "/" + $file;
        sysFile -copy $dst $src;
    }

    MEL scripts can stay on the network since they are not locked by Maya. Also, I even went so far as the name the files on the net so they ended in something like ".mayaplugin" because I wanted to make sure no one could get lazy and just link to the files on the net.

    note: It would be cool to be able to check the dates of the files about to be copied and only copy if the network files were newer but apparently there is no way to do that easily from MEL

    How do you add Maya to your build process/tool path?

    Call me crazy but it seems to me the smartest way to make a game is to make your tools start with the source data and convert it to the game data. That means for example if you have a photoshop file you need to have made into a texture you put that photoshop file some place in your conversion environment, makefile, whatever, and it gets converted to a texture. This way, your artists only have to deal with one file, the photoshop file. The same for Maya. You start with the Maya .MB file, you put it in your conversion environment, add it to your make file or batch files or whatever and it gets built into game data.

    For whatever reason, it seems like 80 or 90% of the companies out there don't do this. Instead they expect their artists to hand export the data. Load up Photoshop, load in your texture, save as ".tim" or ".myimageformat" Load up your Maya file, select a specific node, export it with our custom exporters, give me the exported file.

    That is an atrocious way to do things. There are all kinds of problems with that method

    • Since the original file is not needed to build the game people often forget which file the source is from. (was it zombie_ab_0012_hand_left.mb or zombie_bcd_0233_update.mb??)
    • Often, not always, exporters are context and state sensitive. The correct node must be selected, the time line set, the time range set etc before exporting. Forget something and the data will be bad and you spend sometimes hours trying to figure out why.
    • If you are making a multi-platform game, even if the first version is only one platform, when it comes time to make data for the second platform your artists will have to hand export all that data again
    • If you change the format of your exported data your artists have to hand re-export the data again.

    The point is, exporting the data by hand is BAD BAD BAD.

    So, how do you export the data automatically as part of your build process? Easy: Use Mayabatch. Mayabatch is a separate program from Maya. It's installed by default as of version 7.0. It requires no license unless you are rendering with mental ray so you can put in on any machine. It also loads none of the UI so it runs much faster. Here's some perl I use:

    #!perl
    #
    use strict;
    use warnings;
    
    use IO::Handle;                     # 5.004 or higher
    
    #
    # unixifyPath ($path)
    #
    # change \\ to /
    #
    sub unixifyPath
    {
       my $path = $_[0];
    
       $path =~ s/\\\\/\\//g;
    
       return $path;
    }
    
    my $origFilename   = "mymayafile.mb";
    my $fileToExportTo = "exportedfile.dat";
    my $melFilename    = "tempfile.mel";
    my $melLogFilename = "tempfile.log";
    
    my $outfh = IO::Handle-&gt;new();
    open ($outfh, "&gt;" . $melFilename) or
        die ("couldn't open $! ", $melFilename, "\
    ");
    
    # this line loads the scene
    print $outfh 'file -o "', unixifyPath($origFilename), "\\";\
    ";
    # this line runs our exporter
    print $outfh 'ourExporter "', unixifyPath($fileToExportTo), "\\";\
    ";
    
    close ($outfh);
    
    my $cmd = "mayabatch -nosplash -log \\"" . $melLogFilename .
              "\\" -script \\"" . $melFilename . "\\"";
    system ($cmd);

    It writes out a script to load the scene then execute our plugin. Of course you could write out more melscript to select the correct node or set the timeline etc.

    It also tells maya to write a log file which puts all of your cout << or printfs into the log.

    Note that Maya does not return a correct return value so you'll need to make your plugin either write some kind of status file or output something to the log file

    Also note that Maya only likes forward slashes in its filenames.

    How do you get a list of textures in the current scene FOR REAL?

    most docs will tell you

    string files[] = `ls -type "file"`;
    for (file in files)
    {
        //get the fileTextureName
        string filename = `getAttr (file + ".fileTextureName")`;
    
        print (filename +"\n");
    }

    is all you need. Unfortunately that's not the case. If we have animated textures those will not be include. The function GetListOfAllPossibleTextures below attepts to find those. Note that there is no perfect solution. The solution below is one that works for me.

    /*************************************************************************
                                 GetFrameFile
     *************************************************************************/
    /**
        @brief  Find a file by filename and frameNumber
    
        given a filename with a number already in it, attemps to change
        that number to the given frameNumber and check for that file's
        existance.  If found returns the new filename
    
        Only supports these formats
    
           name#.ext
           name.#.ext
           name####.ext
           name.####.ext
    
        @param  filename
        @param  frameNumber
    
        @return found filename or "" nothing found
    
        @see
    
    */
    /* ----------------------------------------------------------------------- */
    
    proc string GetFrameFile (string filename, int frameNumber)
    {
        string result = "";
    
        // get extension
        string ext = fileExtension(filename);
    
        // exit if no extension
        if (size(ext) > 0)
        {
            // remove the extension
            ext  = "." + ext;
            string work = substring(filename,  1, size(filename) - size(ext));
    
            // get trailing numbers
            string numbers = match("[^0-9][0-9]+", work);
    
            if (size(numbers) > 0)
            {
                // remove the trailing numbers
                numbers = substring (numbers, 2, size(numbers));
                work    = substring (work, 1, size(work) - size(numbers));
    
                // try name#.ext and name.#.ext first
                string test = work + frameNumber + ext;
                if (`file -q -ex test`)
                {
                    result = test;
                }
                else
                {
                    // try name####.ext and name.####.ext
                    string zeros = "000000000000000000000";
                    string fnum  = frameNumber;
    
                    int totalDigits = size(numbers);
                    int haveDigits  = size(fnum);
                    int needDigits  = totalDigits - haveDigits;
    
                    test = work + startString(zeros, needDigits) + fnum + ext;
                    if (`file -q -ex test`)
                    {
                        result = test;
                    }
                }
            }
        }
    
        return result;
    }
    
    /*************************************************************************
                            CheckForTextureFrames
     *************************************************************************/
    /**
        @brief  Check for texture files by frame number
    
                Checks in the given direction for files that match
                the given filename starting at the given frameNumber.
    
                In other words, if you pass in
    
                x:/folder/file.15.tga, 20, 1
    
                it will check for
    
                x:/folder/file.15.tga
                x:/folder/file.16.tga
                x:/folder/file.17.tga
                x:/folder/file.18.tga
                x:/folder/file.19.tga
                x:/folder/file.20.tga
                ...
    
                it will continue until it gets an error but ignore the first 5
                errors. It will not check negative file numbers.
    
                the reason we skip errors is because it's the default for maya to
                set the frame extension to the timeline frame number.  It's
                also common for artists to start numbering from frame 1 so
                if the timeline is set to frame 0 the file maya is looking for
                will not exist.
    
        @param  filename
        @param  frameNumber
        @param  direction   1 or -1
    
        @return string array of files found
    
        @see
    
    */
    /* ----------------------------------------------------------------------- */
    
    proc string[] CheckForTextureFrames (
        string filename,
        int frameNumber,
        int direction)
    {
        string textures[];
        int ignoreErrCount = 5;
    
        while(1)
        {
            ignoreErrCount--;
    
            string frameFile = GetFrameFile(filename, frameNumber);
            if (size(frameFile) > 0)
            {
                textures[size(textures)] = frameFile;
            }
            else
            {
                if (ignoreErrCount &lt;= 0)
                {
                    break;
                }
            }
    
            frameNumber += direction;
            if (frameNumber &lt; 0)
            {
                break;
            }
        }
    
        return textures;
    }
    
    /*************************************************************************
                         GetListOfAllPossibleTextures
     *************************************************************************/
    /**
        @brief  Get a list of all possible textures in a scene
    
            most docs will tell you
    
                string files[] = `ls -type "file"`;
    
            is all you need.  Unfortunately that's not the case.  If we have
            animated textures those will not be include.  This function
            attepts to find those.
    
            Since anything could be driving the frameExtension on an
            animated texture (curve, expression, etc..)
            the only true way to find which textures are used is to
            run the animation and check the result every frame
            but there is no way to tell how many frames to run for.  Just
            because timeline is set to 1-100 doesn't mean the animation
            doesn't actually run 1-500 (or even 423-437)
    
            so....
    
            we just have to make a guess.  For every texture that has
            it's useFrameExtension set I start with the current
            frameNumber and check for existing textures -5 to +5
            frames.  If I find an existing texture file I keep
            checking in that direction.  Hopefully that will find
            all the textures.  It could mean frames not actually used
            well be included in the list.
    
            worse, as far as I can tell, Maya doesn't provide a function
            that turns a filename + frame number into one of their
            supported formats.  At least not from mel.  There's the
            MRenderUtil::exactFileTextureName but I have not been
            able to get it to work
    
            worse yet, the maya docs say name#.ext is not supported
            yet my artists are using that format and it's working.
    
            for now I'm only going to support these formats
    
              name#.ext
              name.#.ext
              name####.ext
              name.####.ext
    
            maya also supports
    
              name.ext.#
              name.ext.####
    
            and
    
              name.#
              name.####
    
            but both of those are left over from unix days when programmers
            thought all users could remember what kind of file some file
            was with no ext and no metadata.  Probably the same programmers
            that thought users would like case sensitive file systems.
            I don't personally know any such users &#128539;
    
        @return
    
    */
    /* ----------------------------------------------------------------------- */
    
    global proc string[] GetListOfAllPossibleTextures()
    {
        string textures[];
    
        string files[] = `ls -type "file"`;
    
        for (file in files)
        {
            string filename = getAttr(file + ".fileTextureName");
    
            // now, is this marked as animated.
    
            if (getAttr(file + ".useFrameExtension"))
            {
                int currentFrame = getAttr(file + ".frameExtension") +
                                            getAttr(file + ".frameOffset");
    
                // check down
                textures = stringArrayCatenate(
                                textures,
                                CheckForTextureFrames(filename, currentFrame, -1));
                // check up
                textures = stringArrayCatenate(
                                textures,
                                CheckForTextureFrames(filename, currentFrame,  1));
            }
            else
            {
                textures[size(textures)] = filename;
            }
        }
    
        textures = stringArrayRemoveDuplicates(textures);
    
        return textures;
    }

    It turns out that doesn't cover it either. "file −q −l" will also get you referenced files as well as textures used as guides in your various views. I'll look into fixing the example above to use that instead.

    What other resources for Mel and Maya API programming are there?

    I'm sure there are more but these are the ones I know about

    Comments

    Game Development Forums

    2002-11-09

    I finally decided to open up a forum for discussing game development.  If you have a question about game development or you would just like to discuss something about game development please leave a message.  Also, feel free to respond to other people's questions and comments.

    How do I access the forums?

    Click here.  Note: even if you have registered at Greggman.com for leaving comments you will need to register separately to use the forums.  See below.

    What are the forums for?

    They are currently for discussing game development.  Anything game development related is fair game.  You want to talk technical that's fine.  I can try.  You want to ask a newbie question that's fine too. As they get more popular I will start dividing them into smaller categories.

    Why do you have the forums?

    Because I get too much e−mail asking how to get into the industry or how to make a game.  Instead of answering each person individually my naive hope is that people will first check if the answer is already in the forums and save me from having to answer it twice.  It is also my hope that some of my friends in the industry will help answer some of the questions.

    Why can't I log in?

    One possible reason is because you need to register separately to use the forum vs. registering to leave comments on the regular website pages.  I hope someday to fix that but as I don't have the time I thought it was better to make the forums available now instead of waiting until I got around to it.

    What are the RULES?

    Please don't be mean.  Please don't call people names.  Please do your best to be thoughtful and helpful.  And, PLEASE PLEASE PLEASE see if you can find the answer already there.  I don't have time to answer every question so if I get too many of the same questions I'll have no time to answer any.

    Comments

    Games-O-The-Greggman

    2000-04-02

    I've been programming games since high−school. I got interested in computers when my friend, Greg Marquez, showed me his first program in written in BASIC in 8th grade in 1979. We geeked out from then on along with our other friends, John Alvarado, Ron Nakada and Andy Brown and we were sure we'd start a video game company together and write hit video games right out of school. We called ourselves the Nighthawk Group and got blue polo shirts made with our logo on the back. Ron was the first to get a computer. It was an Atari 800 and from then on we hung out at Ron's after school until my parents bought me one too. It was also an Atari 800 with 32K of memory and a tape drive. I bought a 16K upgrade for $119 which maxed the computer out at 48K.

    We used to get a magazine called Softdisk I think and it had relatively large type in programs. We learned most programming by typing in these programs and examining how they worked as we typed in line after line and debugged them of typos.

    At the end of high−school my father worked at Hughes Aircraft Company and saw an ad, 'Programmers Wanted' on the bulletin board. We called the number on the ad and I got my first commercial contract to convert Centipede from the Atari 800 to the Commodore 64. John and I did it in 6 weeks and got paid $3000. I'm sure Atarisoft made several million with it. Next we worked on Mario Bros for the Commodore 64 but before we finished Atari was sold to the Tramiels and the Atarisoft division was closed. I've heard that the game made it to the pirate circuit.

    For school, Greg, John and Andy when to UCLA, Ron when to USCD and I went to BYU.

    From there I ended up running away with my first love to Philadelphia and then to Baltimore where I got my first job working at M.U.S.E. I helped program (and draw art for) the educational game 'Leaps and Bounds' with Silas Warner as the lead programmer and then moved on to work at Microprose where I worked on Gunship for the Commodore 64, IBM PC, Atari ST and Amiga as well as animation tools for Pirates and Red Storm Rising, compression for Conflict in Vietnam and a few gauges for F-19 Stealth Fighter.

    I was getting anxious to start our company that we had hoped to start in high−school so in early 88 I came back to So.Cal with the intent of starting a company with John and Greg who were still at UCLA. John and I worked on a port of 'Street Sports Basketball' from the Commodore 64 to the Amiga for Epyx. John and his girlfriend Diana (now wife) did most of the art and John also wrote a 6502 to 68000 translator in a language called ICON that he learned at UCLA.

    In September I was offered a ton of money (at least it seemed like a ton at the time) to work at a company called 'Cinemaware.' The sad thing was that the day I started some friends of mine that also worked there took me out to lunch and told me they were all quitting very soon because they didn't like the place. I was supposed to work on 'TV Sports Football' for the IBM, a port of the Amiga version, but the Amiga version was not finished and so I was told to help out on 'Lords of the Rising Sun' for the Amiga which was also behind. I worked on a lot of the glue and I programmed the battle sequence.

    That was no fun because since the product was already far behind at the time I started on it the lead programmer requested that I work with him from 4pm to 10am. I did get to see it snow one night in So.Cal but it was all gone before daylight.

    Soon after I started, my friends that said they were going to leave did in fact leave and started a company called Atomic Entertainment and then renamed Aftershock. They got three contracts from Activision and they asked me if I would be interested in getting a fourth contract with their help. It sounded like a great idea so I quit Cinemaware and started on a game for Activision. Aftershock's games were really technically advanced for their time. They had 256 color, full screen 60hz scrolling levels on a 368pc back when most games were EGA. They were arguably several years before their time. Unfortunately, that was just a few months before Activision declared bankruptcy and cancelled something like 40 projects.

    Around then John and Greg had recently finished up at UCLA and were ready to start game programming so they got a contract to do a game and I ended up helping out. The game was 'Future Classics', a collection of five small but fun games.

    Actually I think only 1 of them, Diskman, was fun, but we felt like we were on the way to starting our own company. One of the things that came out of developing Future Classics was tUME. Unfortunately the contract was vastly under funded and by the end of it I had maxxed out my credit cards paying rent and things like that. Sooo, I applied and got a job at Virgin Mastertronic to program Caesar's Palace on the Gameboy but I was quickly asked to do some minor work on 'Spot' and was then made Lead Programmer on 'M.C Kids' for the NES.

    After M.C Kids, John ended up getting a job at Virgin too and I was pretty excited to be able to work with him again but then there was a run in with the infamous bad management at Virgin and so I was freelancing again. My next project was 'Terminator vs. Robocop' for the NES for Interplay which as far as I know was never released. The artwork and design were horrible. Near the end of that project I was asked to write MyPaint for the Sega CD.

    It started on March 15th and the publisher wanted it finished by June 1st but they didn't deliver the sound and graphics until October 20th so needless to say the project was late and then even later because by that time I had been recruited by my friend Lyle Hall to work at a new company called Crystal Dynamics that was started solely to create titles for the new 32bit systems which at that time only consisted of the 3DO. I was Lead Programmer on Gex but Crystal was under some major time crunches to get 'Crash n Burn' and 'Total Eclipse' shipped so I helped a little with those before putting my full time into Gex.

    Near the end of Gex, John called from Virgin and told me that he and the 3DO Demolition Man team were considering leaving Virgin because Virgin, in their infinite wisdom, was going to split them up and put them on separate teams. John wanted to know if I would consider joining the m. The answer was YES! This time things looked good because we had 3 programmers and 3 artists and a producer so we'd have a complete team. We decided to call the company Seven and setup shop in Irvine. We ended up getting a contract with Universal Interactive Studios to do Disruptor for the M2. Unfortunately the M2 was not ready to develop for and after 7 months of frustration with unfinished development hardware the project was cancelled.

    As almost anybody will tell you, a company with 7 partners is a bad idea because it's very hard to get everybody to agree and with that and some other conflicts Seven decided the break up. Four of us stuck around and formed our another company, Big Grub. We had up to 16 people working at our there at it's height. We were making a 2D/3D adventure. The best explanation I can think of is take Diablo but make it play like Zelda from the Super Nintendo. Unfortunately it didn't work out for various reasons. See Starting Your Own Game Company for some details.

    So, around Sept 97, after I decided that Big Grub was not going to work for me I thought about what I wanted to do next. Two companies that were in the area were a little interesting, Shiny Entertainment because my friend Tom Tanaka worked there and Naughty Dog because they were making the hit series Crash Bandicoot. At the time though I was studying Japanese so I thought about it and decided, what the heck. I was 33 and no responsibilities (ie, no girlfriend and no family) so I thought I should go to Japan to study Japanese for real. Of course I would need a job. I talked to my friend Mark Cerny who had worked in Japan at Sega for 3 years. He said he was traveling to Japan in December to promote Crash 2 and that I should go with him and he'd introduce me to Sega.

    So, I studied my ass off even more for the next 2 months, 2 2 hour classes at OCC, 3 2 hour classes at Berlitz and r sessions of 2 hours of practice a week with Japanese speaking friends plus homework until I went met up with Mark in Japan in mid December 97. I got accepted to AM1, makers of House of the Dead, The Harley Davidson Game, and I think home to all the Sega Print Club machines. I was supposed to start Feb 1st, 1998

    I sold most of my possessions, my car, I got rid of my apartment but as Feb 1st came by my work visa didn't arrive. I was without a car and without a place to live. I ended up living at the Big Grub offices for 4 months. During that time I found out that Wild 9 was in desperate need of some help to meet some deadlines and was hired under contract to help meet those deadlines. My visa came in mid March but Shiny begged me to stay until E3 which was near the end of May. I agreed and left for Japan May 27th, 1997.

    Arriving in Japan I started a Sega of Japan on June 1st and was put on the Zombie Revenge team for the Naomi Arcade System. I was also asked to write tools/plugins for 3D Studio Max, Lightwave and Alias/Poweranimator to convert from those programs to the Sega development libraries.

    Unfortunately even though I had studied Japanese for almost 2 years my language skills really weren't that good. Fortunately Sega put me on the team with a English speaking team member, Ando Takeshi. If it wasn't for him I would never have survived. Still, I asked him to try not to use any English if possible and for the first few months, most of my communication with the team was through pictures. They'd draw what they wanted and I'd make it.

    Being a programmer is not a great way to learn a foreign language because it's generally a solitary endeavor. Once something was explained I could go off and not really need to talk to anybody for a couple of days. On top of which if I did need to talk to somebody it was generally highly technical so generally I didn't communicate much.

    This is a common thing I'm told but many people moving to a foreign country after about 6 months get really depressed about being in a foreign country. I was no exception. Not able to communicate well I didn't really feel like I had any real friends and I also didn't feel I was really contributing to the team as much as I would have liked.

    Well, around that time a friend of mine, Evan Wells, tempted me by telling me about an opportunity to work at Naughty Dog on a PS2 project. PS2 had all the hype and it was pretty tempting. My original plan was to stay in Japan for 3 years. That's what I had told myself and Sega. But, the deal at Naughty Dog was arguably something I couldn't turn down. It took me about 2.5 months to decide but I finally decided to work at Naughty Dog.

    The sad thing is, about 3 weeks after that (1) my project at Sega finished, (2) that meant lots more free time for friends (3) my language skills got better. Basically I started having a great time but I had already made all the plans to leave so I came back to the U.S. on March 8th, 1999

    At Naughty Dog I was asked to work on CTR:Crash Team Racing. This is probably the funnest game I've worked on. This or M.C. Kids. The thing that makes CTR so fun is multiplayer mode. The whole office was pretty much always playing the game. That's fairly unusual. Most games, even if they are fun you get tired of playing every day but not CTR. Of course the game is a kart game so it's got lots in common with other kart games but there are several touches we were very proud of. To name a few, the tires look pretty cool. Check em out. The textures on the track almost never res−out (ie, turn blocky) This is something I'm not sure most people notice and alot of work went into it but I think people did notice it looks good. The turbo system is very cool and combined with the shortcuts it can be really fun. I think the favorite shortcut in the game is on the snow level if you are doing well and you get your turbos in the right places you can jump the river but if you are off even slightly you fall in the river and it's a pretty big penalty. If feels REALLY GOOD when you make it! CTR was very well received. Check out some of the reviews.

    There are lots of nice touches. For example if you race Time Trial and you get a certain time it unlocks a pre−recorded "ghost" of one of the characters racing so you can try to beat his time. If you beat him then another even harder "ghost" character appears. This ghost is an actual recording of the best race of one of the two designers of the game. They are pretty darn good so if you can beat them you're really good.

    After that I started working on a PS2 game at Naughty Dog but around June I decided that I just couldn't take the stress anymore. Naughty Dog is a very high stress environment. At least 2 others before me left for the same reason although they left calmly. I left by blowing up. 😞
    So, after that I decide to come back to Japan and continue studying. The first time, when I worked at Sega I worked 10am to 11:30pm 5 days a week with an hour and 20 minute commute. That's 8:40 am to 12:50 am. It was pretty hard to get any real studying done that way. This time I came here without a job which enabled me to study fulltime.

    I studied fulltime for 19 months or until I ran out of money at which point I went back to Sega. I decided to stay in Japan even though the pay is bad because I still didn't feel my Japanese was close to fluent. I was in the same group as before but their name had changed temporarily to Wow Entertainment.

    It didn't work out though. First they put me on a Gamecube game only to decide they were not going to make any GameCube games a month later and cancelling the project. They then told me I would be on the House of the Dead 4 team but the House of the Dead team was still making House of the Dead 3 and had 3 or 4 months to go. Next they put me on the Shinsengumi team. You may notice Sega never released a Shinsengumi game. Basically they had a deal with a famous manga company that was supposed to supply both the art and the design. Not having any design sense for games there was never any progress.

    So, instead I took it on myself and re−wrote their 3d tool chain and the libraries to use them. Before that all artwork had to go through a programmer to make it into the game. Their tools would convert the graphics to C source. They'd run the C source through a compiler to turn it into runtime data and compile it into the code. Every piece had to be separately exported, models, animations, cameras. Levels were generally built by hand typing positions by hand into C++. I got rid of all of that and changed it to a western style system that would let artists and designers make graphics, characters, cutscenes and levels all without a programmer.

    But, having never been officially on a team and doing that entire system basically on my own I wasn't getting any Japanese practice and I was getting paid poorly so I figured I was just wasting my time and decided to quit and go back to the USA.

    Around that time the chance to pitch a game to Sony of Japan came up and I spent 4 months on that instead of going back. At the end I was pretty broke and needed a job ASAP. Although I was looking in the USA I applied to a few local companies because I really needed something ASAP or I would have started not being able to pay the rent. Sony of Japan contacted me and even though it didn't pay well it seemed like a good opportunity and I really needed the job so I took it.

    At first I was on a new PS3 team as one of only 3 people on the team. The programmer (me), an artist and the producer. We pitched ideas to upper management for 18 months but none ever got approved. During this time I had made friends with Kouno−san and he had managed to get LocoRoco approved.

    With 18 months of my life basically gone to pitches and no project in sight I asked to be switched to the LocoRoco team which is the last game I shipped. LocoRoco is so far the game I'm most proud of. It's super fun and it was a small team. For the first 6 months there were only 3 programmers and over the entire project there were effectively only 4. That means even though it's a typical 32bit game with all the pieces a 32bit game needs the 4 of us wrote it ourselves completely from scratch in a year including amazing tools, an amazing environment and we made an amazing game. It feels really good to have done so well with such a small team.

    Comments

    HTML Entities (characters)

    1999-01-01

    Here's a list of "entities" as they are called by the HTML standard

     &nbsp; no-break space = non-breaking space, U+00A0 ISOnum
    ¡&iexcl; inverted exclamation mark, U+00A1 ISOnum
    ¢&cent; cent sign, U+00A2 ISOnum
    £&pound; pound sign, U+00A3 ISOnum
    ¤&curren; currency sign, U+00A4 ISOnum
    ¥&yen; yen sign = yuan sign, U+00A5 ISOnum
    ¦&brvbar; broken bar = broken vertical bar, U+00A6 ISOnum
    §&sect; section sign, U+00A7 ISOnum
    ¨&uml; diaeresis = spacing diaeresis, U+00A8 ISOdia
    ©&copy; copyright sign, U+00A9 ISOnum
    ª&ordf; feminine ordinal indicator, U+00AA ISOnum
    «&laquo; left-pointing double angle quotation mark = left pointing guillemet, U+00AB ISOnum
    ¬&not; not sign, U+00AC ISOnum
    ­&shy; soft hyphen = discretionary hyphen, U+00AD ISOnum
    ®&reg; registered sign = registered trade mark sign, U+00AE ISOnum
    ¯&macr; macron = spacing macron = overline = APL overbar, U+00AF ISOdia
    °&deg; degree sign, U+00B0 ISOnum
    ±&plusmn; plus-minus sign = plus-or-minus sign, U+00B1 ISOnum
    ²&sup2; superscript two = superscript digit two = squared, U+00B2 ISOnum
    ³&sup3; superscript three = superscript digit three = cubed, U+00B3 ISOnum
    ´&acute; acute accent = spacing acute, U+00B4 ISOdia
    µ&micro; micro sign, U+00B5 ISOnum
    &para; pilcrow sign = paragraph sign, U+00B6 ISOnum
    ·&middot; middle dot = Georgian comma = Greek middle dot, U+00B7 ISOnum
    ¸&cedil; cedilla = spacing cedilla, U+00B8 ISOdia
    ¹&sup1; superscript one = superscript digit one, U+00B9 ISOnum
    º&ordm; masculine ordinal indicator, U+00BA ISOnum
    »&raquo; right-pointing double angle quotation mark = right pointing guillemet, U+00BB ISOnum
    ¼&frac14; vulgar fraction one quarter = fraction one quarter, U+00BC ISOnum
    ½&frac12; vulgar fraction one half = fraction one half, U+00BD ISOnum
    ¾&frac34; vulgar fraction three quarters = fraction three quarters, U+00BE ISOnum
    ¿&iquest; inverted question mark = turned question mark, U+00BF ISOnum
    À&Agrave; latin capital letter A with grave = latin capital letter A grave, U+00C0 ISOlat1
    Á&Aacute; latin capital letter A with acute, U+00C1 ISOlat1
    Â&Acirc; latin capital letter A with circumflex, U+00C2 ISOlat1
    Ã&Atilde; latin capital letter A with tilde, U+00C3 ISOlat1
    Ä&Auml; latin capital letter A with diaeresis, U+00C4 ISOlat1
    Å&Aring; latin capital letter A with ring above = latin capital letter A ring, U+00C5 ISOlat1
    Æ&AElig; latin capital letter AE = latin capital ligature AE, U+00C6 ISOlat1
    Ç&Ccedil; latin capital letter C with cedilla, U+00C7 ISOlat1
    È&Egrave; latin capital letter E with grave, U+00C8 ISOlat1
    É&Eacute; latin capital letter E with acute, U+00C9 ISOlat1
    Ê&Ecirc; latin capital letter E with circumflex, U+00CA ISOlat1
    Ë&Euml; latin capital letter E with diaeresis, U+00CB ISOlat1
    Ì&Igrave; latin capital letter I with grave, U+00CC ISOlat1
    Í&Iacute; latin capital letter I with acute, U+00CD ISOlat1
    Î&Icirc; latin capital letter I with circumflex, U+00CE ISOlat1
    Ï&Iuml; latin capital letter I with diaeresis, U+00CF ISOlat1
    Ð&ETH; latin capital letter ETH, U+00D0 ISOlat1
    Ñ&Ntilde; latin capital letter N with tilde, U+00D1 ISOlat1
    Ò&Ograve; latin capital letter O with grave, U+00D2 ISOlat1
    Ó&Oacute; latin capital letter O with acute, U+00D3 ISOlat1
    Ô&Ocirc; latin capital letter O with circumflex, U+00D4 ISOlat1
    Õ&Otilde; latin capital letter O with tilde, U+00D5 ISOlat1
    Ö&Ouml; latin capital letter O with diaeresis, U+00D6 ISOlat1
    ×&times; multiplication sign, U+00D7 ISOnum
    Ø&Oslash; latin capital letter O with stroke = latin capital letter O slash, U+00D8 ISOlat1
    Ù&Ugrave; latin capital letter U with grave, U+00D9 ISOlat1
    Ú&Uacute; latin capital letter U with acute, U+00DA ISOlat1
    Û&Ucirc; latin capital letter U with circumflex, U+00DB ISOlat1
    Ü&Uuml; latin capital letter U with diaeresis, U+00DC ISOlat1
    Ý&Yacute; latin capital letter Y with acute, U+00DD ISOlat1
    Þ&THORN; latin capital letter THORN, U+00DE ISOlat1
    ß&szlig; latin small letter sharp s = ess-zed, U+00DF ISOlat1
    à&agrave; latin small letter a with grave = latin small letter a grave, U+00E0 ISOlat1
    á&aacute; latin small letter a with acute, U+00E1 ISOlat1
    â&acirc; latin small letter a with circumflex, U+00E2 ISOlat1
    ã&atilde; latin small letter a with tilde, U+00E3 ISOlat1
    ä&auml; latin small letter a with diaeresis, U+00E4 ISOlat1
    å&aring; latin small letter a with ring above = latin small letter a ring, U+00E5 ISOlat1
    æ&aelig; latin small letter ae = latin small ligature ae, U+00E6 ISOlat1
    ç&ccedil; latin small letter c with cedilla, U+00E7 ISOlat1
    è&egrave; latin small letter e with grave, U+00E8 ISOlat1
    é&eacute; latin small letter e with acute, U+00E9 ISOlat1
    ê&ecirc; latin small letter e with circumflex, U+00EA ISOlat1
    ë&euml; latin small letter e with diaeresis, U+00EB ISOlat1
    ì&igrave; latin small letter i with grave, U+00EC ISOlat1
    í&iacute; latin small letter i with acute, U+00ED ISOlat1
    î&icirc; latin small letter i with circumflex, U+00EE ISOlat1
    ï&iuml; latin small letter i with diaeresis, U+00EF ISOlat1
    ð&eth; latin small letter eth, U+00F0 ISOlat1
    ñ&ntilde; latin small letter n with tilde, U+00F1 ISOlat1
    ò&ograve; latin small letter o with grave, U+00F2 ISOlat1
    ó&oacute; latin small letter o with acute, U+00F3 ISOlat1
    ô&ocirc; latin small letter o with circumflex, U+00F4 ISOlat1
    õ&otilde; latin small letter o with tilde, U+00F5 ISOlat1
    ö&ouml; latin small letter o with diaeresis, U+00F6 ISOlat1
    ÷&divide; division sign, U+00F7 ISOnum
    ø&oslash; latin small letter o with stroke, = latin small letter o slash, U+00F8 ISOlat1
    ù&ugrave; latin small letter u with grave, U+00F9 ISOlat1
    ú&uacute; latin small letter u with acute, U+00FA ISOlat1
    û&ucirc; latin small letter u with circumflex, U+00FB ISOlat1
    ü&uuml; latin small letter u with diaeresis, U+00FC ISOlat1
    ý&yacute; latin small letter y with acute, U+00FD ISOlat1
    þ&thorn; latin small letter thorn, U+00FE ISOlat1
    ÿ&yuml; latin small letter y with diaeresis, U+00FF ISOlat1
    Latin Extended-B
    ƒ&fnof; latin small f with hook = function = florin, U+0192 ISOtech
    Greek
    Α&Alpha; greek capital letter alpha, U+0391
    Β&Beta; greek capital letter beta, U+0392
    Γ&Gamma; greek capital letter gamma, U+0393 ISOgrk3
    Δ&Delta; greek capital letter delta, U+0394 ISOgrk3
    Ε&Epsilon; greek capital letter epsilon, U+0395
    Ζ&Zeta; greek capital letter zeta, U+0396
    Η&Eta; greek capital letter eta, U+0397
    Θ&Theta; greek capital letter theta, U+0398 ISOgrk3
    Ι&Iota; greek capital letter iota, U+0399
    Κ&Kappa; greek capital letter kappa, U+039A
    Λ&Lambda; greek capital letter lambda, U+039B ISOgrk3
    Μ&Mu; greek capital letter mu, U+039C
    Ν&Nu; greek capital letter nu, U+039D
    Ξ&Xi; greek capital letter xi, U+039E ISOgrk3
    Ο&Omicron; greek capital letter omicron, U+039F
    Π&Pi; greek capital letter pi, U+03A0 ISOgrk3
    Ρ&Rho; greek capital letter rho, U+03A1
     there is no Sigmaf, and no U+03A2 character either
    Σ&Sigma; greek capital letter sigma, U+03A3 ISOgrk3
    Τ&Tau; greek capital letter tau, U+03A4
    Υ&Upsilon; greek capital letter upsilon, U+03A5 ISOgrk3
    Φ&Phi; greek capital letter phi, U+03A6 ISOgrk3
    Χ&Chi; greek capital letter chi, U+03A7
    Ψ&Psi; greek capital letter psi, U+03A8 ISOgrk3
    Ω&Omega; greek capital letter omega, U+03A9 ISOgrk3
    α&alpha; greek small letter alpha, U+03B1 ISOgrk3
    β&beta; greek small letter beta, U+03B2 ISOgrk3
    γ&gamma; greek small letter gamma, U+03B3 ISOgrk3
    δ&delta; greek small letter delta, U+03B4 ISOgrk3
    ε&epsilon; greek small letter epsilon, U+03B5 ISOgrk3
    ζ&zeta; greek small letter zeta, U+03B6 ISOgrk3
    η&eta; greek small letter eta, U+03B7 ISOgrk3
    θ&theta; greek small letter theta, U+03B8 ISOgrk3
    ι&iota; greek small letter iota, U+03B9 ISOgrk3
    κ&kappa; greek small letter kappa, U+03BA ISOgrk3
    λ&lambda; greek small letter lambda, U+03BB ISOgrk3
    μ&mu; greek small letter mu, U+03BC ISOgrk3
    ν&nu; greek small letter nu, U+03BD ISOgrk3
    ξ&xi; greek small letter xi, U+03BE ISOgrk3
    ο&omicron; greek small letter omicron, U+03BF NEW
    π&pi; greek small letter pi, U+03C0 ISOgrk3
    ρ&rho; greek small letter rho, U+03C1 ISOgrk3
    ς&sigmaf; greek small letter final sigma, U+03C2 ISOgrk3
    σ&sigma; greek small letter sigma, U+03C3 ISOgrk3
    τ&tau; greek small letter tau, U+03C4 ISOgrk3
    υ&upsilon; greek small letter upsilon, U+03C5 ISOgrk3
    φ&phi; greek small letter phi, U+03C6 ISOgrk3
    χ&chi; greek small letter chi, U+03C7 ISOgrk3
    ψ&psi; greek small letter psi, U+03C8 ISOgrk3
    ω&omega; greek small letter omega, U+03C9 ISOgrk3
    ϑ&thetasym; greek small letter theta symbol, U+03D1 NEW
    ϒ&upsih; greek upsilon with hook symbol, U+03D2 NEW
    ϖ&piv; greek pi symbol, U+03D6 ISOgrk3
    General Punctuation
    &bull; bullet = black small circle, U+2022 ISOpub
     bullet is NOT the same as bullet operator, U+2219
    &hellip; horizontal ellipsis = three dot leader, U+2026 ISOpub
    &prime; prime = minutes = feet, U+2032 ISOtech
    &Prime; double prime = seconds = inches, U+2033 ISOtech
    &oline; overline = spacing overscore, U+203E NEW
    &frasl; fraction slash, U+2044 NEW
    Letterlike Symbols
    &weierp; script capital P = power set = Weierstrass p, U+2118 ISOamso
    &image; blackletter capital I = imaginary part, U+2111 ISOamso
    &real; blackletter capital R = real part symbol, U+211C ISOamso
    &trade; trade mark sign, U+2122 ISOnum
    &alefsym; alef symbol = first transfinite cardinal, U+2135 NEW
     alef symbol is NOT the same as hebrew letter alef, U+05D0 although the same glyph could be used to depict both characters
    Arrows
    &larr; leftwards arrow, U+2190 ISOnum
    &uarr; upwards arrow, U+2191 ISOnum
    &rarr; rightwards arrow, U+2192 ISOnum
    &darr; downwards arrow, U+2193 ISOnum
    &harr; left right arrow, U+2194 ISOamsa
    &crarr; downwards arrow with corner leftwards = carriage return, U+21B5 NEW
    &lArr; leftwards double arrow, U+21D0 ISOtech
     ISO 10646 does not say that lArr is the same as the 'is implied by' arrow but also does not have any other character for that function. So ? lArr can be used for 'is implied by' as ISOtech suggests
    &uArr; upwards double arrow, U+21D1 ISOamsa
    &rArr; rightwards double arrow, U+21D2 ISOtech
     ISO 10646 does not say this is the 'implies' character but does not have another character with this function so ? rArr can be used for 'implies' as ISOtech suggests
    &dArr; downwards double arrow, U+21D3 ISOamsa
    &hArr; left right double arrow, U+21D4 ISOamsa
    Mathematical Operators
    &forall; for all, U+2200 ISOtech
    &part; partial differential, U+2202 ISOtech
    &exist; there exists, U+2203 ISOtech
    &empty; empty set = null set = diameter, U+2205 ISOamso
    &nabla; nabla = backward difference, U+2207 ISOtech
    &isin; element of, U+2208 ISOtech
    &notin; not an element of, U+2209 ISOtech
    &ni; contains as member, U+220B ISOtech
     should there be a more memorable name than 'ni'?
    &prod; n-ary product = product sign, U+220F ISOamsb
     prod is NOT the same character as U+03A0 'greek capital letter pi' though the same glyph might be used for both
    &sum; n-ary sumation, U+2211 ISOamsb
     sum is NOT the same character as U+03A3 'greek capital letter sigma' though the same glyph might be used for both
    &minus; minus sign, U+2212 ISOtech
    &lowast; asterisk operator, U+2217 ISOtech
    &radic; square root = radical sign, U+221A ISOtech
    &prop; proportional to, U+221D ISOtech
    &infin; infinity, U+221E ISOtech
    &ang; angle, U+2220 ISOamso
    &and; logical and = wedge, U+2227 ISOtech
    &or; logical or = vee, U+2228 ISOtech
    &cap; intersection = cap, U+2229 ISOtech
    &cup; union = cup, U+222A ISOtech
    &int; integral, U+222B ISOtech
    &there4; therefore, U+2234 ISOtech
    &sim; tilde operator = varies with = similar to, U+223C ISOtech
     tilde operator is NOT the same character as the tilde, U+007E, although the same glyph might be used to represent both
    &cong; approximately equal to, U+2245 ISOtech
    &asymp; almost equal to = asymptotic to, U+2248 ISOamsr
    &ne; not equal to, U+2260 ISOtech
    &equiv; identical to, U+2261 ISOtech
    &le; less-than or equal to, U+2264 ISOtech
    &ge; greater-than or equal to, U+2265 ISOtech
    &sub; subset of, U+2282 ISOtech
    &sup; superset of, U+2283 ISOtech
     note that nsup, 'not a superset of, U+2283' is not covered by the Symbol font encoding and is not included. Should it be, for symmetry? It is in ISOamsn
    &nsub; not a subset of, U+2284 ISOamsn
    &sube; subset of or equal to, U+2286 ISOtech
    &supe; superset of or equal to, U+2287 ISOtech
    &oplus; circled plus = direct sum, U+2295 ISOamsb
    &otimes; circled times = vector product, U+2297 ISOamsb
    &perp; up tack = orthogonal to = perpendicular, U+22A5 ISOtech
    &sdot; dot operator, U+22C5 ISOamsb
     dot operator is NOT the same character as U+00B7 middle dot
    Miscellaneous Technical
    &lceil; left ceiling = apl upstile, U+2308 ISOamsc
    &rceil; right ceiling, U+2309 ISOamsc
    &lfloor; left floor = apl downstile, U+230A ISOamsc
    &rfloor; right floor, U+230B ISOamsc
    &lang; left-pointing angle bracket = bra, U+2329 ISOtech
     lang is NOT the same character as U+003C 'less than' or U+2039 'single left-pointing angle quotation mark'
    &rang; right-pointing angle bracket = ket, U+232A ISOtech
     rang is NOT the same character as U+003E 'greater than' or U+203A 'single right-pointing angle quotation mark'
    Geometric Shapes
    &loz; lozenge, U+25CA ISOpub
    Miscellaneous Symbols
    &spades; black spade suit, U+2660 ISOpub
     black here seems to mean filled as opposed to hollow
    &clubs; black club suit = shamrock, U+2663 ISOpub
    &hearts; black heart suit = valentine, U+2665 ISOpub
    &diams; black diamond suit, U+2666 ISOpub
    "&quot; quotation mark = APL quote, U+0022 ISOnum
    &&amp; ampersand, U+0026 ISOnum
    <&lt; less-than sign, U+003C ISOnum
    >&gt; greater-than sign, U+003E ISOnum
    Latin Extended-A
    Œ&OElig; latin capital ligature OE, U+0152 ISOlat2
    œ&oelig; latin small ligature oe, U+0153 ISOlat2
     ligature is a misnomer, this is a separate character in some languages
    Š&Scaron; latin capital letter S with caron, U+0160 ISOlat2
    š&scaron; latin small letter s with caron, U+0161 ISOlat2
    Ÿ&Yuml; latin capital letter Y with diaeresis, U+0178 ISOlat2
    Spacing Modifier Letters
    ˆ&circ; modifier letter circumflex accent, U+02C6 ISOpub
    ˜&tilde; small tilde, U+02DC ISOdia
    General Punctuation
    &ensp; en space, U+2002 ISOpub
    &emsp; em space, U+2003 ISOpub
    &thinsp; thin space, U+2009 ISOpub
    &zwnj; zero width non-joiner, U+200C NEW RFC 2070
    &zwj; zero width joiner, U+200D NEW RFC 2070
    &lrm; left-to-right mark, U+200E NEW RFC 2070
    &rlm; right-to-left mark, U+200F NEW RFC 2070
    &ndash; en dash, U+2013 ISOpub
    &mdash; em dash, U+2014 ISOpub
    &lsquo; left single quotation mark, U+2018 ISOnum
    &rsquo; right single quotation mark, U+2019 ISOnum
    &sbquo; single low-9 quotation mark, U+201A NEW
    &ldquo; left double quotation mark, U+201C ISOnum
    &rdquo; right double quotation mark, U+201D ISOnum
    &bdquo; double low-9 quotation mark, U+201E NEW
    &dagger; dagger, U+2020 ISOpub
    &Dagger; double dagger, U+2021 ISOpub
    &permil; per mille sign, U+2030 ISOtech
    &lsaquo; single left-pointing angle quotation mark, U+2039 ISO proposed
     lsaquo is proposed but not yet ISO standardized
    &rsaquo; single right-pointing angle quotation mark, U+203A ISO proposed
     rsaquo is proposed but not yet ISO standardized
    &euro; euro sign, U+20AC NEW
    Comments

    Making Games

    1998-08-27

    This page is old.  Go read the newer version.


    Do you know what it really takes to make a video game? Do you know why a game costs $60 or even $80. Making a game takes a ton of work.

    Sometimes I think I should try to teach a class in it in high school. Creating a game might be something that some students might want to do and having a class about it would allow them to experience what it really takes to make a game. It's not just about having fun, it's about lots and lots of work. It's about reports, schedules, budgets, tradeoffs, teamwork. All the things I wasn't taught in high school or college for that matter.

    Pitching

    Most people think that a game starts when someone has a great idea for a game. The problem is that almost everyone in the industry and every game player thinks they have a great idea for a game. Someone has to be convinced that your idea is the one idea that should get done. This is done by pitching the game whether you're an internal team (a team that is internal to the game publisher) or an external development team (a team not owned by any publishing company but that does products on contract for a publisher.)

    To pitch a game you have to create pitch materials. The better your materials the better your chance of getting your game approved. Usually the minimum materials are a small report 2 or 3 pages describing the game briefly. If you can't describe the game briefly then you are unlikely to be able to keep the attention of the people you are trying to sell the game to. Most of them are not game players. Another common pitch material is the storyboard. Storyboards attempt to show the game with pictures. Good looking storyboards definitely make an impression over those teams that don't have them. Even better than storyboards is an actual demo of the game.

    Time and Money

    What many people don't realize is that the game they pitch must be able to be done in a certain amount of time within a certain budget. Lets say you wanted to make a 3D Fighting game with 20 different characters and 1 background for each character. An intro video introducing the game and a video ending for each character when that character wins the game. How much time and how many people is that going to require.

    Lets guess that each character will take 1 month to create in 3D and animate. Each background also takes 1 month. The 3D programming we guess will take 1 year. The intro video will take 4 months and each ending video will take 1 month. Add it up.<ul>

  • 1 month 20 characters = 20 months
  • 1 month 20 backgrounds = 20 months
  • 1 year of programming = 12 months
  • 1 intro video = 4 months
  • 1 ending video * 20 characters = 20 months
  • That's 20+20+12+4+20 = 76 months. In other words, if one person could do all the work by themselves it would take them 6 years to make the game. Of course 6 years is too long to take to make a game. If you started today, in 6 years the video game systems that people have at home would probably have been replaced. Instead of a Sony Playstation they'd have a Sony Playstation 2 or maybe even 3 and your game would have no market anymore.

    Most publishers would like a game to take about 1 year. So if you wanted to get your game done in a year you're going to need at least 7 people. 76 months / 7 = 10.8 months or almost 1 year.

    How much do 7 people cost for a year? Well an artist can cost anywhere from $30,000 a year to $100,000 a year depending on their experience. A programmer from $40,000 to $100,000. Lets just guess and assume you get 6 artists for $45,000 each and one programmer for $65,000. That's $45,000*6 + $65,000 = $335,000. But wait, people need benefits like health insurance, they need supplies like paper and pencils. They need a place to work like an office with a desk, a phone and a chair. You also have to pay certain taxes in addition to the taxes that each person on the team pays. All that adds up to around 30% of their salary. So, $335,000*30% = $100,500. Your total cost is now $335,000+$100,500 = $440,000. Okay, now you need equipment and software. Each artist and programmer needs at least one computer. A reasonable computer with monitor will cost at least $3000. Artists need software and 3D software can be very expensive. Lets say you decide to use 3D Studio Max. That's $3500. They may need a copy of Photoshop or some other painting software which is about $600. Your programmer will need a an editor $200, and a development system, $30,000. So the total for equipment so far is

    Total so far, $516,500.

    Now lets say you ask a publisher for $516,500 and they agree to give it to you to make the game. What did you forget? Well some things that come to mind, music and sound effects for one. Also, your schedule probably didn't take into account all the communication that needs to go on between team members so they are all working as a team. Do you need someone to lead the team? Do you need a art director to organize the artists and make sure that all the artwork in the game has a consistent look? You could ask one of your 6 artists to do it but then they will be busy managing the other artists and won't have as much time to get their work done. Who is going to pay the bills, do the payroll, order the equipment and software. Whoever does it will have less time for working on the game. What about a network? Are you going to have a network so that people can share there work with each other without having to use lots of floppy disks?

    Lets add one more artist as art director and because they are the art director they command a higher salary of $60,000. You also hire a producer or manager to both organize the team and pay the bills and manage the other money matters. (Maybe you don't like the idea of hiring a manager and instead you want to manage. Now your time is taken up by managing so you are going to need to hire someone else to do the work you no longer have time for. Either way it's going to require another person). You need to contract out for music and sound effects. That can easily cost $60,000 to $80,000.

    Lets add that in.<ul>

  • 1 art director = $60,000 + 30% for rent, insurance, taxes, supplies, ... = $78,000
  • 1 producer = $40,000 + 30% for overhead = $52000
  • Music and sound fx = $70,000
  • 2 more machines = $3000 * 2 = $6000
  • 1 more 3D Studio Max = $3500
  • 1 peer to peer network = $4000
  • New total = $4000+3500+6000+70000+52000+78000+516500 = $730,000

    Lets say you ask for $730,000 from a publisher and they give it to you. You now have enough money to pay your team for exactly one year and no more. If you forgot something tough luck. If it takes 16 months instead of 12 you're going to go hungry for 4 of those months or your going to have to re−negotiate with your publisher and they are going to want something in return for your failure to deliver your game within the time and budget you originally promised. They might for example lower your royalties or they might demand a part of your company. They might ask you all to take a 50% pay cut until you finish.

    Lets take a look at royalties. Most games by external developers are done on an advance against royalties arrangement. That means that the $730,000 they gave you is an advance against your royalties. Maybe you got 15% royalties and the game sells for a suggested list price of $49.95. You don't get 15% of $49.95. You get 15% of net so if the list price is $49.95 the wholesale price is probably 45% of that or $22.48. If this is a Sony Playstation or Sega Saturn game they both charge around $8.00 per disc sold as a licensing fee so the net price is $14.48. 15% of that is $2.17. Your team gets $2.17 per unit sold. You got an advance of $730,000. $730,000 / $2.17 = 336,406 units. You must sell 336,406 units before your team will see any more money than they already got. Not very many games sell 336,406 units. Maybe only the top 10 games on any platform.

    Another issue that comes up here is the feeling that the publisher is being greedy.   The typical point of view of the developer, you, is that you are going to do all the work and they are getting 85% of that $14.48.  You feel like you should get more.   I know I often felt this way.  Here's the other point of view.  From the view of the publisher they put in $730,000 and probably several $100,000 more on marketing and plus they also need to pay sales people and marketing people and producers etc.   Lets say they spent a total of $1,500,000 on your game.  What have you spent?   You've spent $0.  They are risking $1.5 million dollars on you.  If you or your team fails they are out $1.5 million dollars.  On the other hand you risk nothing.  If you fail you already got from them $730,000 dollars.  That hardly seems fair.  The reason they get all the money is that they are the people taking all the risk.  That actually brings up another point, if you want a better deal, lower their risk.  For example if you develop the game entirely on your own and then once it's finished you go to them and they decide to publish it you can usually get a much better deal.  The reason is that they don't have to risk as much money.  Of course they still have to risk all the money they will spend of advertising and duplication and distribution and sales.  Unfortunately most people can't make a product on their own.  It takes too long and too many people.

    Design

    Design is going to be different for different types of games.  For the type of game I like to make, action games or action adventure games, I personally believe the best way to design is by storyboard and sketches.  I've seen teams make huge documents 300 to 400 pages long for their games and I personally don't think it works.  Nobody wants to read a 300 document.  Instead you probably need some kind of outline just so you can make sure you've got everything listed.  Then you need to design each world and each character and each object.  Each item will need two basic things, a visual design and a behavioral design.  The visual design would be designed by the artists.   This is one way to get your artists involved in the game.  Give them a basic idea of what you want to do with the game and then give them a couple of days to go off and sketch settings or characters or objects.  Then have a big meeting and decide which of their ideas you want to actually use in the game.  Once you've chosen, have the artists make much more detailed color version of those items.  You see this type of thing in movie production.  The #1 reason you need this is you need to make sure everybody understands what everybody is trying to make and a visual picture is your blueprint.  In other words, "make what you see in the picture".

    The perfect example of this is the original Star Wars.  If you look in to the making of Star Wars you will see lots of paintings by a guy named Ralph McQuarrie.  I used to think those painting were made after the movies since they looks so close to scenes in the movies but actually the opposite is true.  Mr. McQuarrie drew those paintings and then from those paintings people made the movie.  If you think about it you can see why this is so important.  It takes lots of people to make movies and video games and without images like these nobody will have the same idea for how to make their particular piece of a level or scene.

    Secondly you need behavioral design.  This is best done with sketches.  In the movies this would be the black and white sketches that show each scene and camera angle.  In a game these would be sketches that show each item and character and all their moves and behaviors with notes giving details for things like timing, speed, distance, power etc.  While working in Zombie Revenge at Sega I saw hundreds of these sketches.  Every motion needed for every character had a sketch describing the motion BEFORE it was created.

    Levels also need to be sketched.  These should look like blueprints or top down maps that show where each item/door/character etc should be.  Having worked both ways I personally believe levels should be laid out on paper by game designers and THEN those designs should be handed off to artists so the artist can build the level based on the game designers blue print.  This lets the game designer make sure the level is designed to be fun, fair, not frustrating, etc and lets the artist make it look beautiful.   Some of you are going to think you can just jump into a map editor or 3d program and start creating a level.  I could happen but I've never seen a really good level come out this way on time.  The problem is without a blueprint you have no idea where you are going or when you're done.  You'll just keep noodling and noodling until you get bored and start working on something else.  If you have a blueprint you'll have a specific goal in mind.  You'll know when you are finished and when you are not.   You'll know what other things need to be created for the level before the level is even built.

    The successful companies where great products are made on time the designer is at the top of the heap. From the designers the game is made.  That means they must be good people capable of leading, of creating designs that are possible, of not creating frivolous un−thought−through designs that the team implements and then have to be thrown away.  They need to be aware that from their designs, thousands of dollars will be spent implementing them and that bad decisions from them will cost lots of money and possibly the entire project.

    Programming

    Art

    You're Done

    to be continued...


    Comments
    older
    newer